comments edit

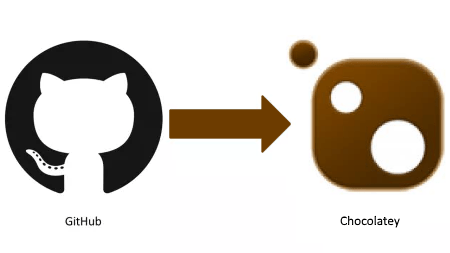
Following up on CoolWhip, ChocolateyCoolWhip is a nuget package that makes creating, packaging, and deploying your code through Chocolatey.org simple. Like CoolWhip, all you need to do to publish a new release is create release in GitHub.

Chocolatey?

In case you aren’t familiar, Chocolatey is a package manager for Windows built on top of NuGet and PowerShell. It allows users to download and install thousands of software programs with a single command. For example, to install nodejs, all you would need to do is open up a command prompt and enter

> choco install nodejs.install

Getting Started with ChocolateyCoolWhip

To get started, install the nuget package into your project. The first thing you’ll notice is that it creates nuspec and AppVeyor configuration files. Chocolatey uses the nuspec as metadata for your package, the same way NuGet does.

Once setup, all you need to do to update your package on Chocolatey.org is create a release in GitHub. ChocolateyCoolWhip will pull the version information directly from the release name and kick off a build in AppVeryor. You have complete control over versioning your application

Configuration is simple:

  1. Connect AppVeyor to your GitHub repo
  2. Install the NuGet package >Install-Package ChocolateyCoolWhip
  3. Update the generated nuspec file with your project’s information
  4. Add your authorization tokens to the AppVeyor.yml file
  5. Save/commit your changes

Once this is set up, all you’ll need to do in order to release (or update) your package on NuGet is create a GitHub release with the version number.

There is full step by step documentation in the wiki.

Happy Coding.

this post was originally on the MasterDevs Blog

Travel, Food comments edit

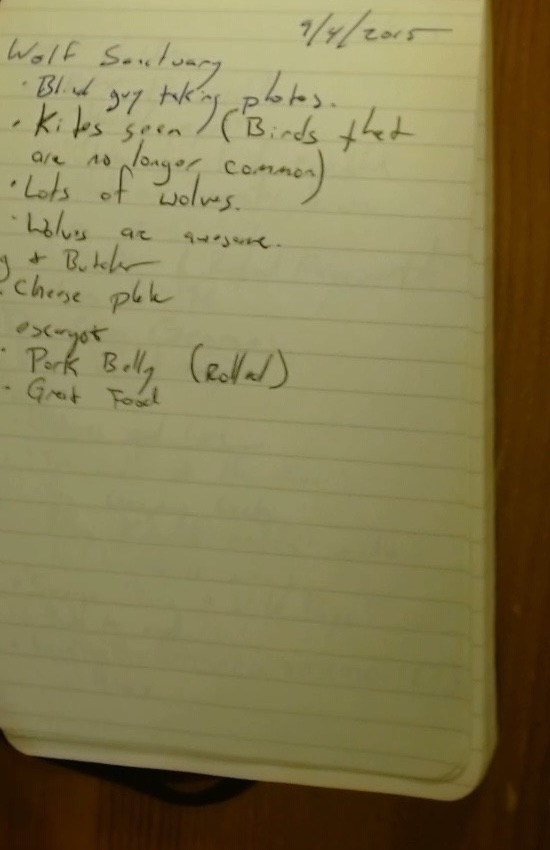
This London trip took us from old manuscripts to old computers, with a lot of bookshops, museums, and food in between. My favorite detours were the Polish Institute and Sikorski Museum, Bletchley Park, and, obviously, the wolf sanctuary. Seeing a pack of wolves up close is hard to beat.

Where we ate

London

Place My take
The Jones Family Project ★★★★☆ — Rib-eye, steak tartare, and a Delmonico cocktail. Very good.
Katzenjammers ★★★★☆ — Bratwurst and the rest of the German food were great.
Princi ★★★☆☆ — The meat lasagna wasn’t as good as I remembered, but still good.
MOC Kitchen ★★★★☆ — Delicious Vietnamese braised-pork bánh mì.
Ye Olde Cheshire Cheese A Samuel Smith lager and cider; Ksenia had steak and ale pie.
Coffee Plant Espresso and an iced chai.
The Duke of Wellington ★★★★☆ — Wild boar sausage and a very good meal, though the lemonade missed.
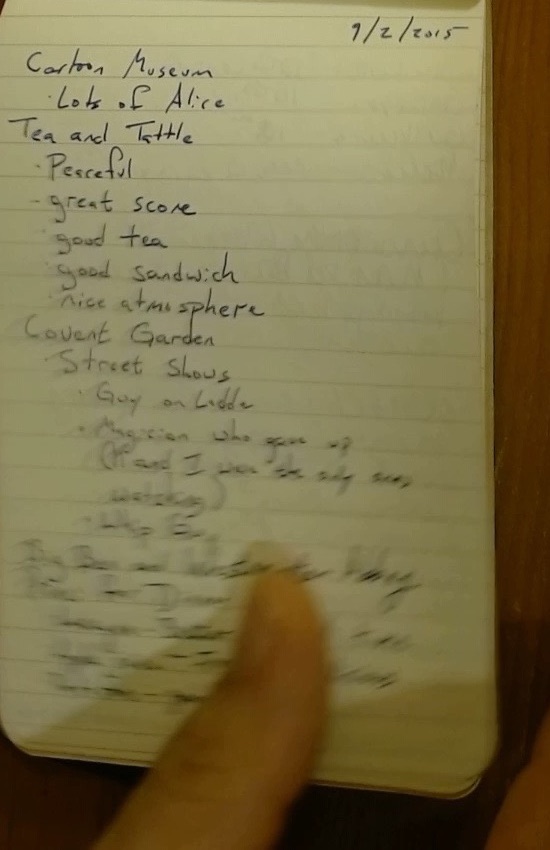
Tea and Tattle ★★★★☆ — A great scone, good tea, a good sandwich, and a peaceful room.
The Pig & Butcher ★★★★★ — Cheese plate, rolled pork belly, and great food all around.

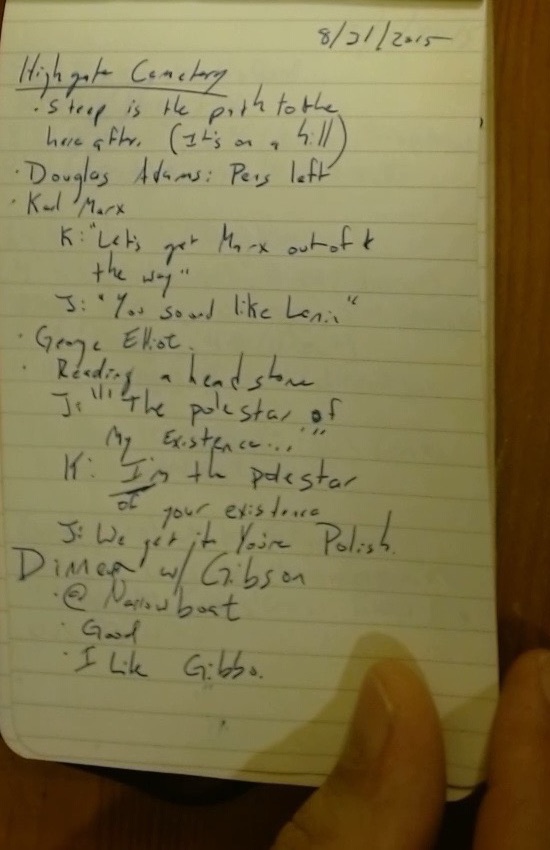
We also had a good dinner with Gibson. I like Gibbo.

Where we stayed

London was our base, with day trips to Bletchley and Oxford.

Places I want to remember

The British Library had the Magna Carta exhibit, Shakespeare’s First Folio, and a Gutenberg Bible. Temple Church, the Charles Dickens Museum, Benjamin Franklin House, Tate Modern, the National Gallery, Shakespeare’s Globe, and Tower Bridge filled the London days. I also loved browsing Persephone Books and walking Portobello Road.

Outside London, The National Museum of Computing was a fine companion to Bletchley Park. In Oxford we visited the Bodleian Library, the History of Science Museum, and Wadham College. Back in London, Highgate Cemetery offered Marx, Douglas Adams, George Eliot, and one very good Lenin joke. Our last outing was for the wolves.

Day by day

Travel comments edit

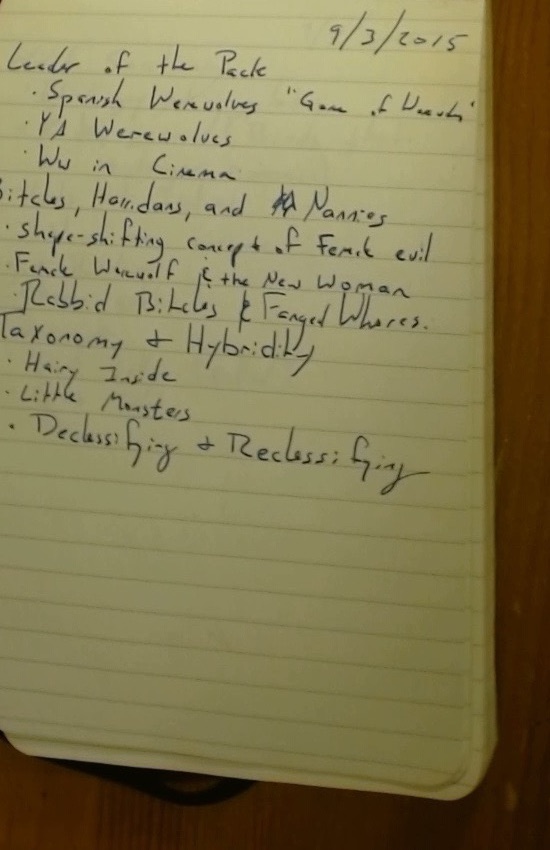
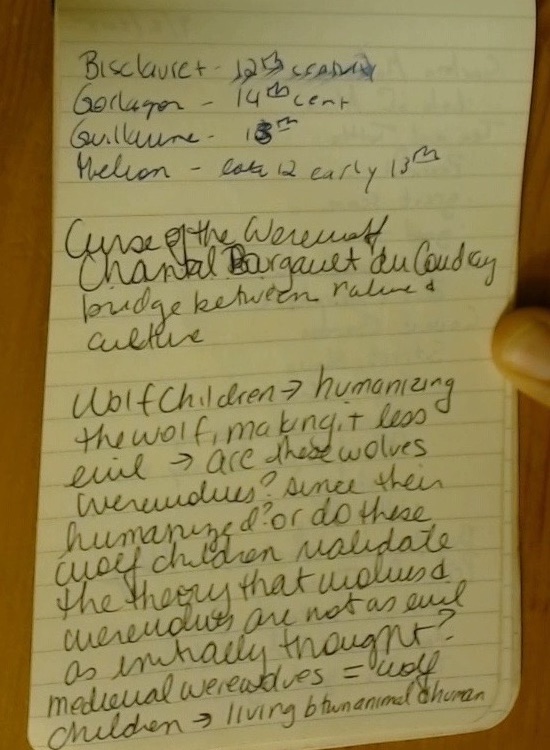
Today was for werewolves. I made notes on Leader of the Pack, including Spanish werewolves and young-adult werewolves, and on Bitches, Hounds, and Nannies. My favorite bit was the taxonomy: hairy giants, little monsters, and the “declassifying and reclassifying” that comes with hybrids. The other side of the page is a longer riff on werewolf lore and what makes the stories work.

London 2015 trip summary.

From the Notebook

London notebook, September 3, 2015: werewolf notes

London notebook, September 3, 2015: more werewolf notes from the facing page

Travel comments edit

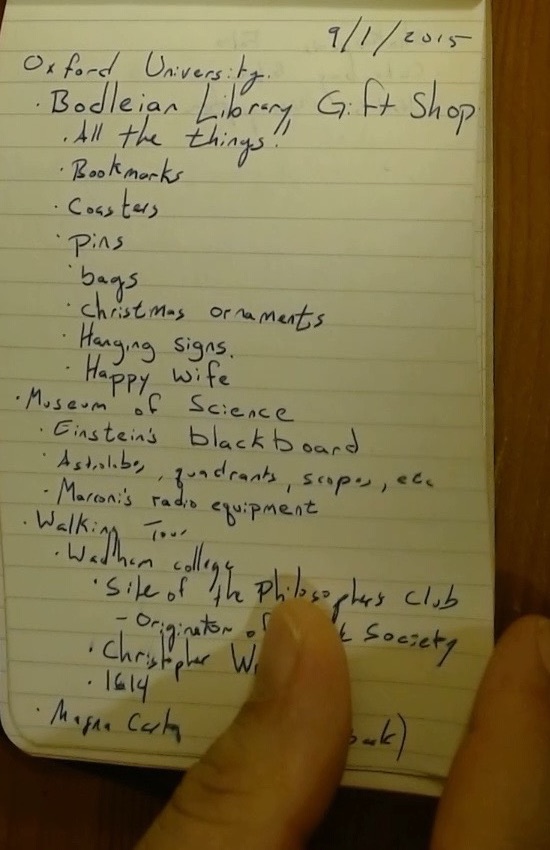
We took the train from Paddington to Oxford. At the Bodleian Library, the gift shop had all the things: bookmarks, coasters, pins, bags, Christmas ornaments, hanging signs. The notebook says “Happy Wife.”

The History of Science Museum had Einstein’s blackboard, astrolabes, quadrants, scopes, and Marconi’s radio equipment. On a walking tour we saw Wadham College and learned about the group that helped give rise to the Royal Society; Christopher Wren came up too. A full day of books, instruments, and Oxford history before the train back to London.

London 2015 trip summary.

From the Notebook

London notebook, September 1, 2015: Oxford

Travel comments edit

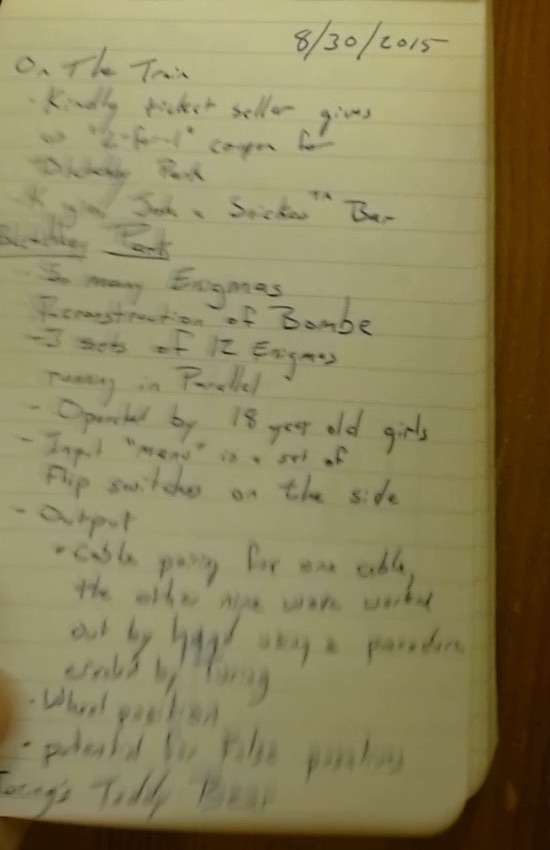
We took the train to Bletchley Park. A kind ticket seller gave us a two-for-one coupon. Inside were so many Enigma machines, a reconstructed Bombe, and the story of the young women who operated it. The work involved banks of Enigmas running in parallel; there was plenty about Alan Turing too.

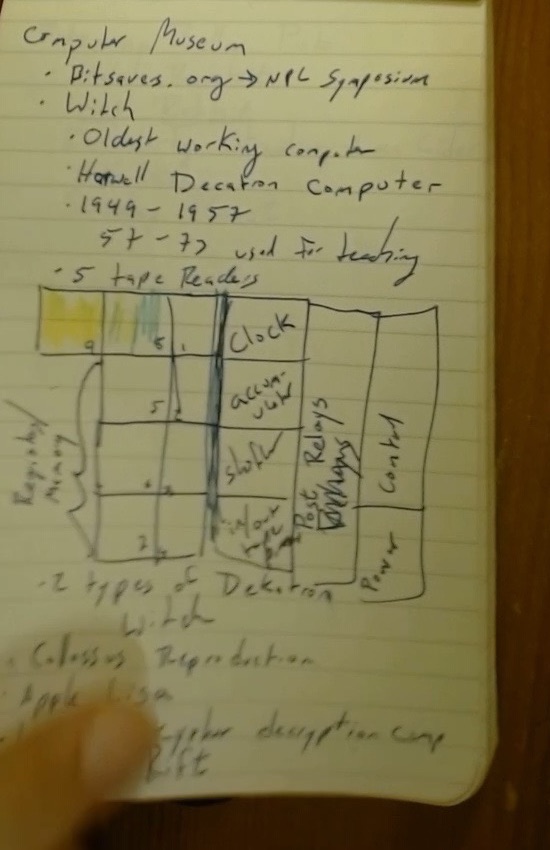
We also went to The National Museum of Computing and saw the Harwell Dekatron Computer, the oldest original working digital computer. It first ran in 1951, served at Harwell until 1957, then was used for teaching into the 1970s. The five tape readers and Dekatron tubes held my attention long enough for a sketch in the notebook.

London 2015 trip summary.

From the Notebook

London notebook, August 30, 2015: Bletchley Park

London notebook, August 30, 2015: National Museum of Computing

Travel, Food comments edit

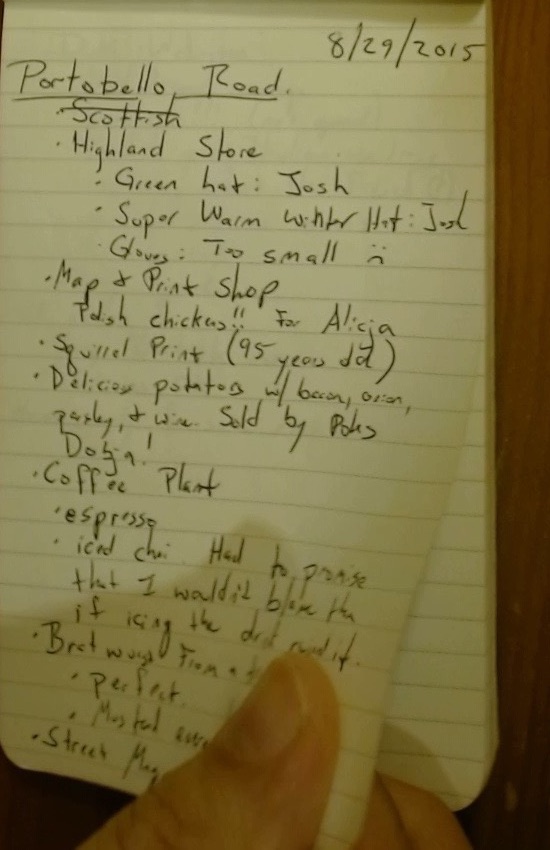
We walked Portobello Road Market and browsed a Scottish Highland shop, a map and print shop, and other stalls. At Coffee Plant I had an espresso and an iced chai.

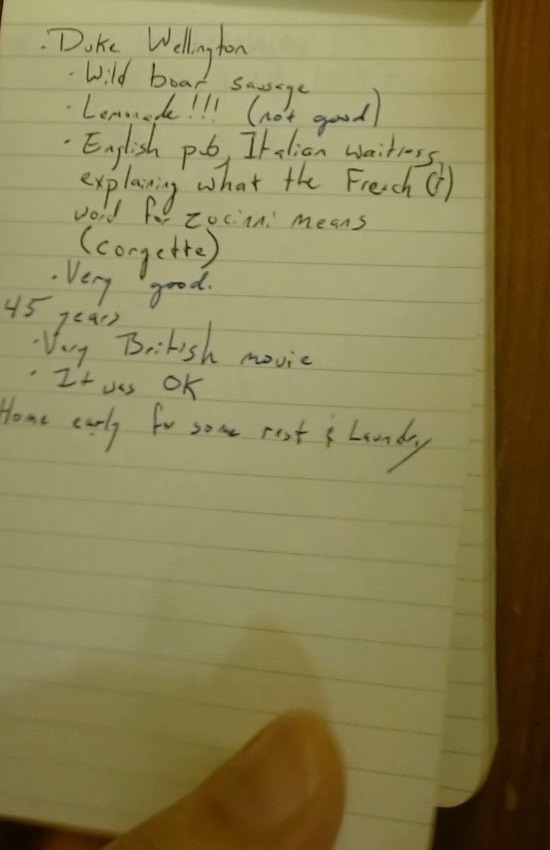
At The Duke of Wellington, I had wild boar sausage. The lemonade was not good, but the meal was very good. The waitress explained that the French word for zucchini is courgette, which was useful to know. Later we saw 45 Years: a very British movie, and okay. We went home early for some rest and laundry.

London 2015 trip summary.

From the Notebook

London notebook, August 29, 2015: Portobello Road

London notebook, August 29, 2015: Duke of Wellington and film

Travel, Food comments edit

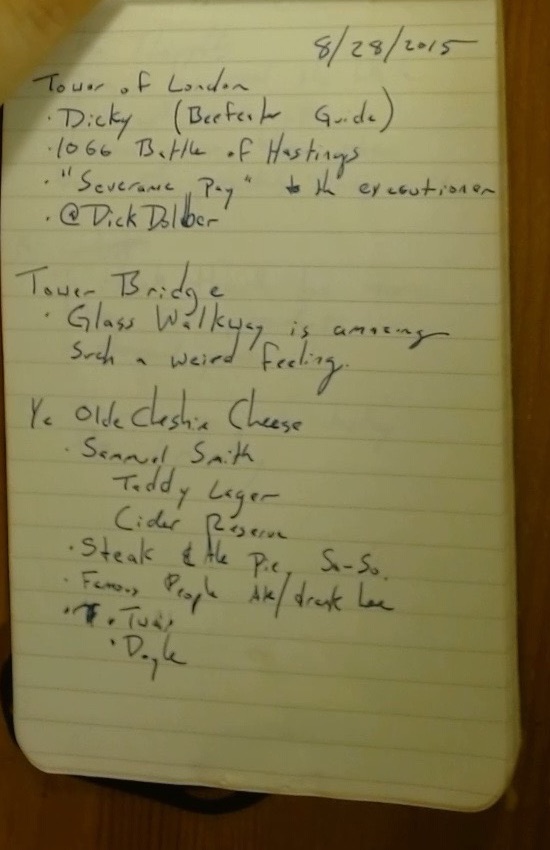
We toured London with Dickie, a Beefeater guide. I wrote down the Battle of Hastings in 1066 and a story about the executioner. Dickie had plenty of stories. At Tower Bridge, walking across the glass floor was amazing and a little unnerving.

At Ye Olde Cheshire Cheese, we had Samuel Smith Taddy Lager and cider; Ksenia had a steak and ale pie. A famous old pub and a good place to sit down after the tour.

London 2015 trip summary.

From the Notebook

London notebook, August 28, 2015: walking tour, Tower Bridge, and pub

Travel, Food comments edit

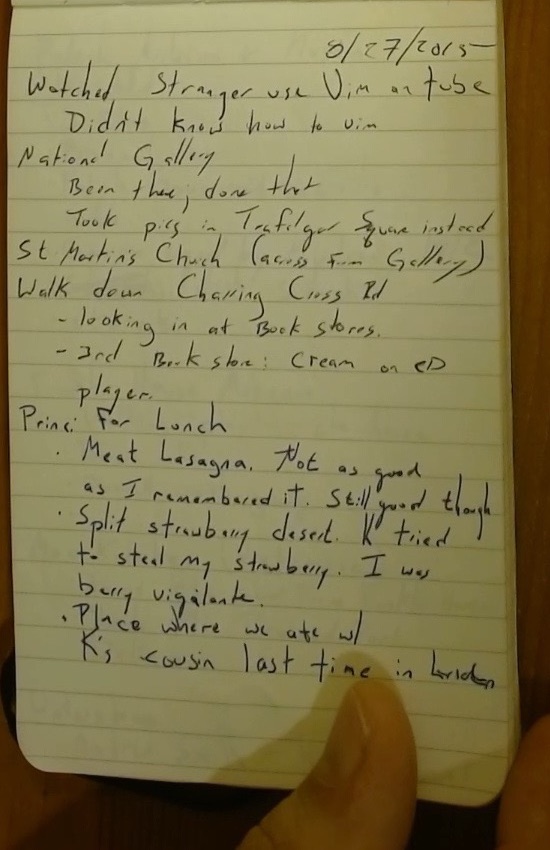
We watched a stranger use a giant touch screen in the National Gallery and went across Trafalgar Square to St Martin-in-the-Fields. I spent some time looking through bookshops on Charing Cross Road, and lunch at Princi was meat lasagna. It wasn’t as good as I remembered, though still good. Ksenia and I split a strawberry dessert; I had to stay alert to get my share of the strawberry. We’d eaten there with her cousin on a previous London visit.

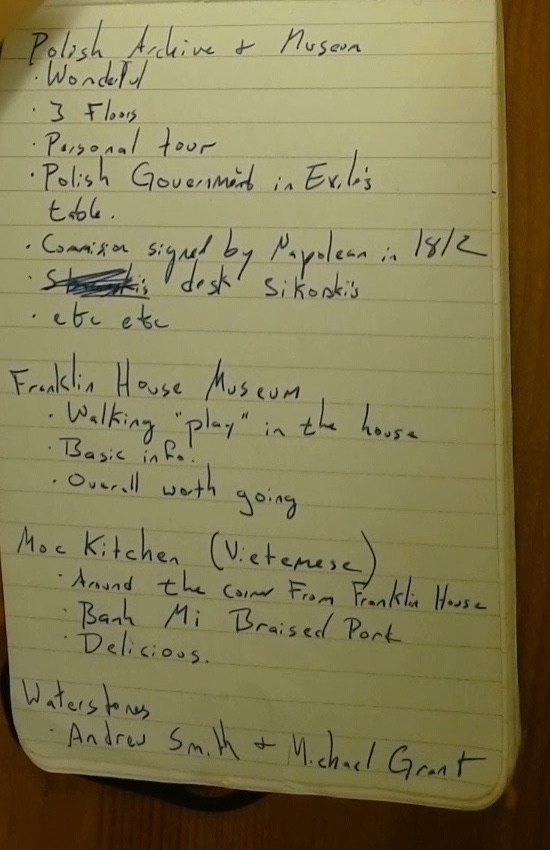
The Polish Institute and Sikorski Museum was wonderful: three floors, a personal tour, and Polish government memorabilia, including a commission signed by Napoleon in 1812 and Sikorski’s desk. The visit to Benjamin Franklin House was a walking play through the house. Basic information, but worth going.

Around the corner, MOC Kitchen served a delicious Vietnamese bánh mì with braised pork. We also went to Waterstones, where I noted Andrew Smith and Michael Grant.

London 2015 trip summary.

From the Notebook

London notebook, August 27, 2015: National Gallery and lunch

London notebook, August 27, 2015: Polish museum, Franklin House, and dinner

Travel, Food comments edit

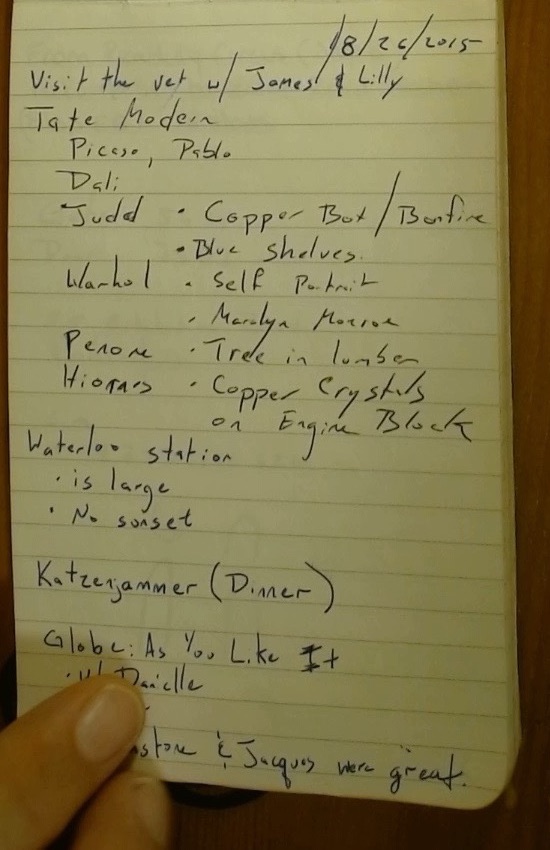
We visited the vet with James and Lilly, then went to Tate Modern. I jotted down Picasso, Dalí, Judd’s copper box and blue shelves, Warhol’s self-portrait and Marilyn Monroe, Penone’s Tree in London, and Hiorns’s copper crystals on an engine block. Waterloo Station was large, with no sunset that I could see.

We saw As You Like It at Shakespeare’s Globe. Dinner was at Katzenjammers, the German beer hall near Borough Market. The bratwurst and the rest of the German food were great.

London 2015 trip summary.

From the Notebook

London notebook, August 26, 2015: Tate Modern and Katzenjammers

Travel, Food comments edit

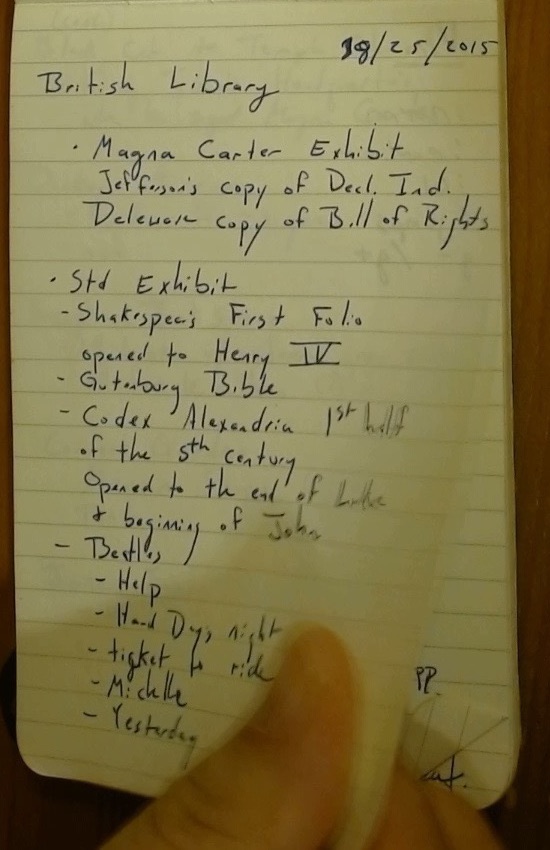
We started at the British Library. The Magna Carta exhibit had Jefferson’s copy of the Declaration of Independence and a copy of the Bill of Rights. In the permanent collection, I saw Shakespeare’s First Folio, a Gutenberg Bible, and part of the fifth-century Codex Alexandrinus, open to the end of Luke and beginning of John. The Beatles display sent me down a small “Help!” rabbit hole.

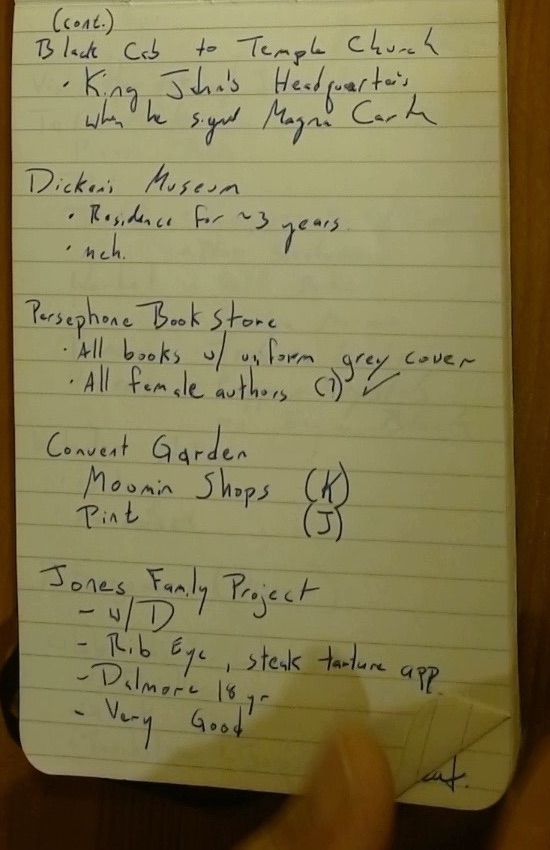
Then it was a black cab to Temple Church, with its connection to King John and Magna Carta. The Charles Dickens Museum was next; Dickens lived in the house for about three years. We also stopped at Persephone Books, with its uniform gray covers and shelves full of women writers, and wandered around Covent Garden. Ksenia found the Moomin shop; I found a pint.

Dinner at The Jones Family Project was very good. I had a rib-eye with a steak tartare appetizer and a Delmonico 18/27 cocktail.

London 2015 trip summary.

From the Notebook

London notebook, August 25, 2015: British Library

London notebook, August 25, 2015: museums, books, and dinner

comments edit

CoolWhip is a NuGet package aimed at making and deploying other NuGet packages easier. With CoolWhip, creating a Release in GitHub automatically pushes that release to NuGet.

Once you’ve installed CoolWhip into your project it will create a nuspec file and AppVeyor configuration file. These will work together to package your project and automatically upload it to NuGet.org.

Once setup, all you need to do to update your package on NuGet.org is create a release in GitHub. CoolWhip will pull the version information directly from the release name and kick off a build in AppVeryor. You have complete control over versioning your application.

To configure CoolWhip you need to

  1. Connect AppVeyor to your GitHub repo
  2. Install the NuGet package >Install-Package CoolWhip
  3. Update the generated nuspec file with your project’s information
  4. Add your authorization tokens to the AppVeyor.yml file
  5. Save/commit your changes

Once this is set up, all you’ll need to do in order to release (or update) your package on NuGet is create a GitHub release with the version number.

There is full step by step documentation in the wiki.

Happy Coding.

this post was originally on the MasterDevs Blog

comments edit

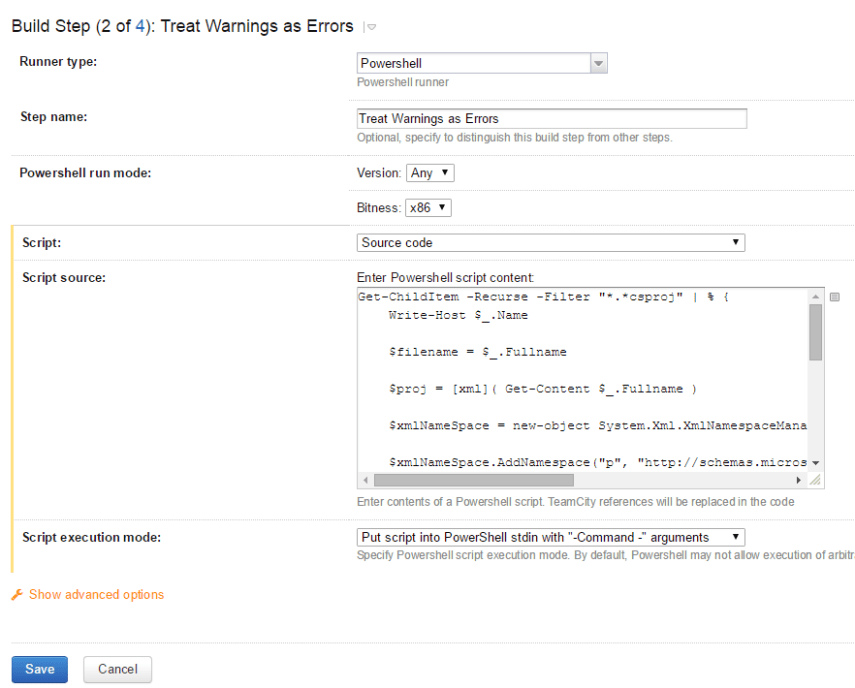
I’m OCD when it comes to my code. I don’t like to have any warnings. I wanted to configure my TeamCity builds to fail if there were any warnings in the projects. My first option is to tick the “Treat warnings as errors” box in the project settings. This had a few problems

Problem 1.

I’d have to remember to do it for every project in my repo, including all the projects I make in the future. Even worse, everyone on my team would have to remember to do that too. That’s not something I could rely on.

Problem 2.

While warnings are just errors that you’re ignoring, I will admit that it is convenient to be able to ignore some things some times. I’m fine with debugging and running locally with some errors. I really only wanted to stop people from committing code back to master with warnings. I couldn’t care less about bad hygiene the have when working locally.

The Solution

In searching, I found David Gardiner’s blog post in which he creates a power shell script to edit the xml in each csproj file. It looks simple enough so I removed the TFS bit and added it as a build step in my TeamCity flow. It runs right before compiling my code.

Get-ChildItem -Recurse -Filter "*.*csproj" | % {
    Write-Host $_.Name
     
    $filename = $_.Fullname
     
    $proj =
1
( Get-Content $_.Fullname ) $xmlNameSpace = new-object System.Xml.XmlNamespaceManager($proj.NameTable) $xmlNameSpace.AddNamespace("p", "http://schemas.microsoft.com/developer/msbuild/2003") $nodes = $proj.SelectNodes("/p:Project/p:PropertyGroup[@Condition and not (p:TreatWarningsAsErrors)]", $xmlNameSpace) $touched = $false $nodes | ForEach-Object -Process { $e = $proj.CreateElement("TreatWarningsAsErrors", "http://schemas.microsoft.com/developer/msbuild/2003") $e.set_InnerText("true") $_.AppendChild($e) | Out-Null $touched = $true } if ($touched) { Write-Host "Checkout $filename" $proj.Save("$($filename)") | Out-Null } }

this post was originally on the MasterDevs Blog

.NET, C# comments edit

Sometimes it is just much easier to deploy a single assembly that includes all dependencies. ILRepack and ILRepack.MSBuild.Task will do just that for you. Since I like to have Visual Studio and my build environment do this for me, I went with ILRepack.MSBuild.Task.

The Sample

In order to showcase packing an assembly into my program, first I need a program that has a dependency. I decided to go with a simple console app that has a dependency on the Humanizer NuGet package to tell you how long you have to wait until your birthday.

>Repack.exe
Usage:   repack [date]
  Prints how long it is until your birthday.
  If you don't supply your birthday, it uses mine.
 
23 weeks until your birthday

I created a new console project in Visual Studio and named it Repack. I then included the Humanizer DLL using the NuGet package manager.

You can find the source code on github.

Using ILRepack

All you need to do is add the following snippet at the end of your .csproj file. To do this, you can open up the .csproj file in notepad or your favorite text [editor])(http://www.vim.org).

<Target Name="AfterBuild" Condition="'$(Configuration)' == 'Release'">
 
 <ItemGroup>
  <InputAssemblies Include="$(OutputPath)\$(AssemblyName).exe" />
  <InputAssemblies Include="$(OutputPath)\*.dll" />
 </ItemGroup>
 
 <ILRepack
  Parallel="true"
  Internalize="true"
  InputAssemblies="@(InputAssemblies)"
  TargetKind="EXE"
  OutputFile="$(OutputPath)\$(AssemblyName).exe"
 />
</Target>

Because we name the target AfterBuild, this code will automatically be run after msbuild or Visual Studio builds our project. Setting the condition ensures that this will only run when we are in release mode. You can definitely run this on debug builds, but it’s less likely that you’d want to.

The ItemGroup specifies lets us create a list of assemblies to include in the package. The first assembly should be your assembly. In my example it will be my executable file Repack.exe. Next, I include all the DLLs in the output directory. This way, if I add a new dependency later, it will be included automatically.

Note that the order does matter. You will want to put the .exe first in this list.

Next all we need to do is call ILRepack. You can specify the output file to be anywhere you like, but in this example I overwrite the existing Repack.exe with the packed version.

Once you rebuild your project (in release mode), you can copy the EXE anywhere you want and it will run.

Summary

ILRepack.MSBuild.Task let’s you package DLL’s into your EXE file so you can copy just the executable anywhere and not have to worry about deploying the dependencies as well.

Full sample code can be found on github.

Happy coding.

this post was originally on the MasterDevs Blog

C#, Tools comments edit

Occasionally I need to FTP into one of my Azure websites. Sometimes it’s to look at the logs; other times to upload a few files. Just about every time I go to do this, I realize that I don’t know the credentials. So I go and download the publish profile and open it up in my favorite text editor to get the FTP information and manually enter that in FileZilla.

I quickly became tired of doing this, so I wrote a console app that will do it for me. The source code and executable are available on my GitHub.

Usage

  1. Download your publish profile
  2. Run the command line tool
  3. Import the config file to FileZilla

Download your publish profile

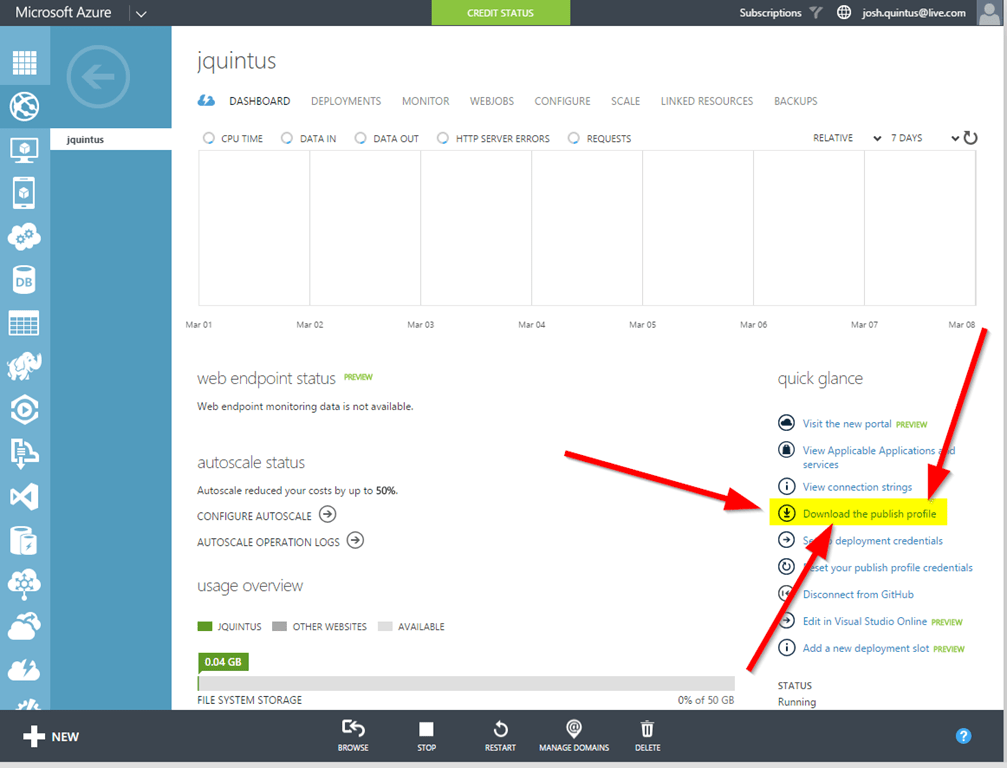
Log on to the Azure management portal for the website you want to FTP into. On the right side of the dashboard page you will see an option to “Download the publish profile.” Click it and you’re on your way.

When downloaded the file will look something like this:

<?xml version="1.0" encoding="utf-8" ?>
<publishData>
  <publishProfile
    profileName="TestSite - Web Deploy"
    publishMethod="MSDeploy"
    publishUrl="testSite.scm.azurewebsites.net:443"
    msdeploySite="testSite"
    userName="$testSite"
    userPWD="test password"
    destinationAppUrl="http://testSite.azurewebsites.net"
    SQLServerDBConnectionString=""
    hostingProviderForumLink=""
    controlPanelLink="http://windows.azure.com"
    webSystem="WebSites">
  </publishProfile>
  <publishProfile
    profileName="TestSite - FTP"
    publishMethod="FTP"
    publishUrl="ftp://waws.ftp.azurewebsites.windows.net/site/wwwroot"
    ftpPassiveMode="True"
    userName="testSite\$testSite"
    userPWD="test password"
    destinationAppUrl="http://testSite.azurewebsites.net"
    SQLServerDBConnectionString=""
    hostingProviderForumLink=""
    controlPanelLink="http://windows.azure.com"
    webSystem="WebSites">
  </publishProfile>
</publishData>

Obviously, all the pertinent connection information has been scrubbed clean. But you get the idea.

Run the command line tool

Next thing you need to do is run pubToFz.exe to convert the publish profile into a format that FileZilla understands. Assuming the default download location, the command would look like this:

pubToFz %home%\downloads\testSite.publishProfile

By default, the tool creates an file named FileZilla.xml in the current directory. The file will look something like this.

<?xml version="1.0" encoding="UTF-8" standalone="yes" ?>
<FileZilla3>
  <Servers>
    <Server>
      <Host>waws.ftp.azurewebsites.windows.net</Host>
      <Port>21</Port>
      <Protocol>0</Protocol>
      <Type>0</Type>
      <User>testsite\$testsite</User>
      <Pass encoding="base64">base 64 encoded test password</Pass>
      <Logontype>1</Logontype>
      <TimezoneOffset>0</TimezoneOffset>
      <PasvMode>MODE_DEFAULT</PasvMode>
      <MaximumMultipleConnections>0</MaximumMultipleConnections>
      <EncodingType>Auto</EncodingType>
      <BypassProxy>0</BypassProxy>
      <Name>TestSite</Name>
      <Comments />
      <LocalDir />
      <RemoteDir />
      <SyncBrowsing>0</SyncBrowsing>
    </Server>
  </Servers>
</FileZilla3>

Again, this was scrubbed clean.

Import the config file to FileZilla

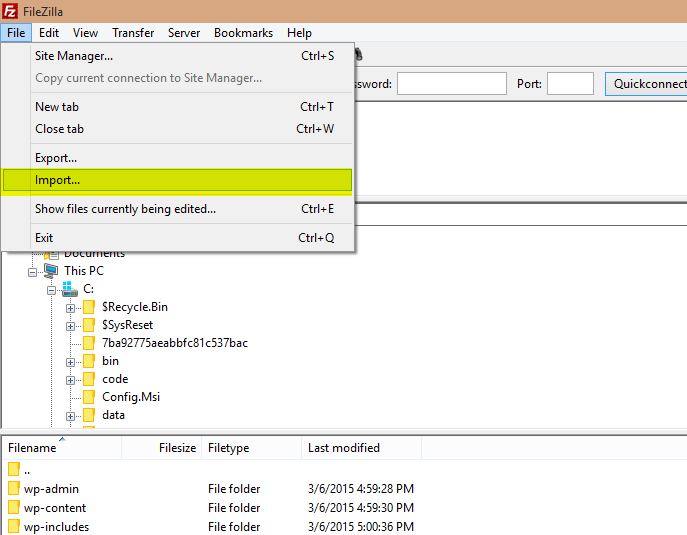
Now all you have to do is open up FileZilla and import the config file that you just saved.

this post was originally on the MasterDevs Blog

CLI, Tips comments edit

I recently stumbled across DOSKEY while reading StackOverflow. Reading the documentation I stumbled across something old and something new.

>doskey/?

<edit>
F7    Displays command history
F8    Searches command history

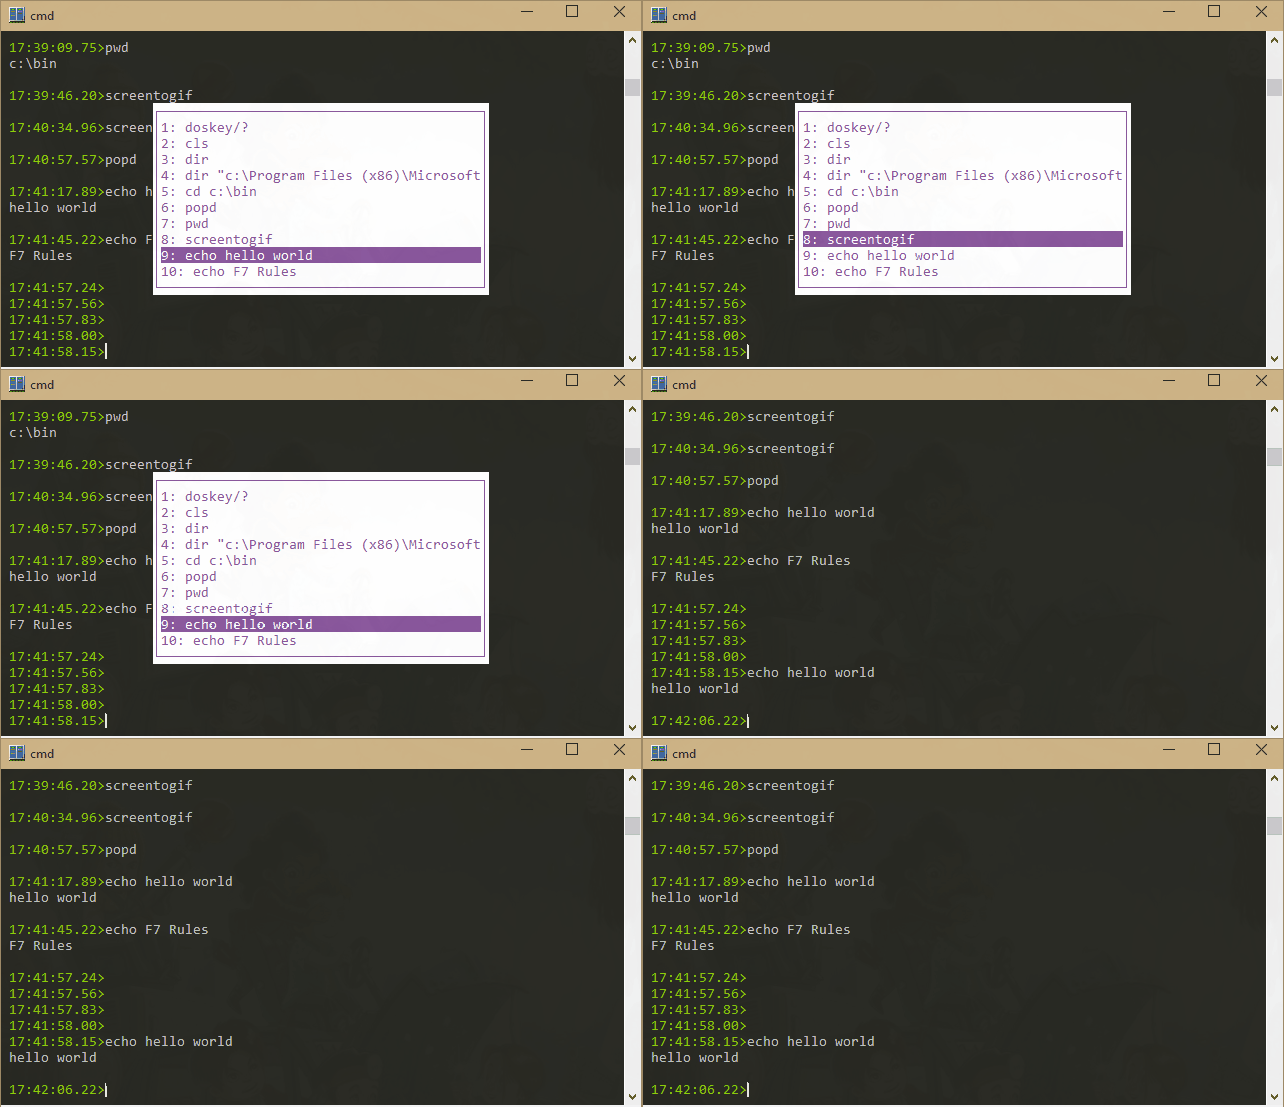
I knew about F7 and use it constantly when I’m on the command line. It pops up a scrollable list of your recent commands.

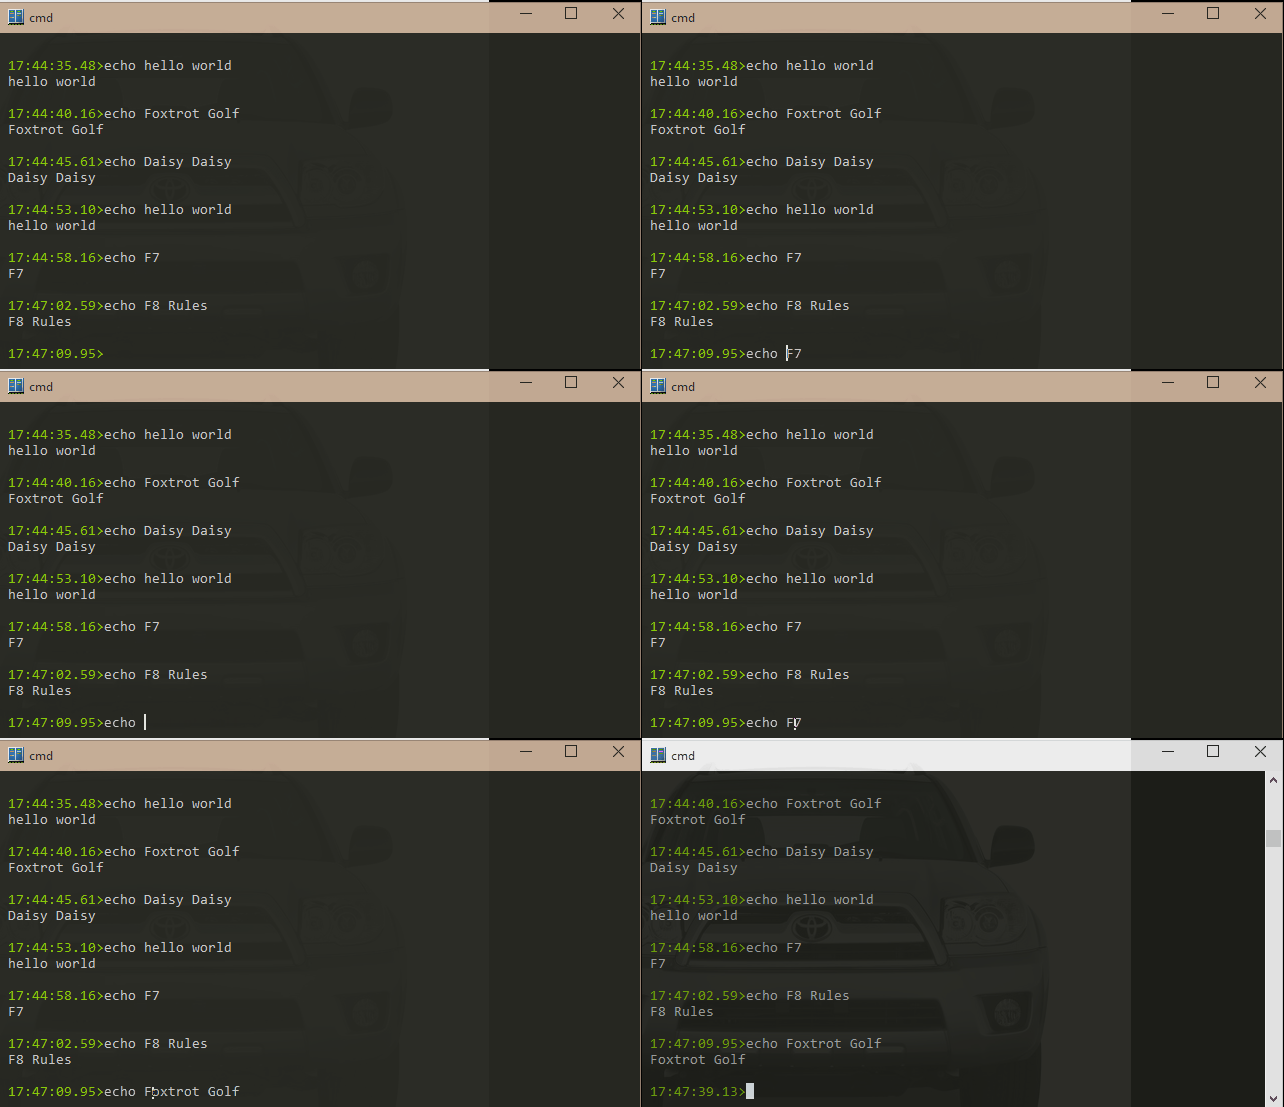
F8 lets you cycle through commands in your history with a search term.

Suppose you had previously typed a complex command. In the example I have below, I used the command echo Foxtrot Golf. To find and execute it again all you need to do is type the beginning of the command and then press the F8 key. In the example, I type echo on the command prompt and cycle through all the commands that start with that by pressing F8. To narrow it down a bit more, I type in echo F and then press F8 to get all the commands that start with that. Note that it is case sensitive.

this post was originally on the MasterDevs Blog

In Android, your options are kind of small for setting a font purely in XML.

In this post, I’ll create a converter so we can specify the font in an MvvmCross binding.

Getting a font

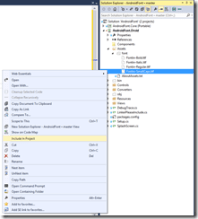
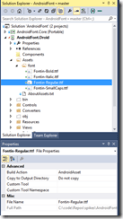
Before going any further, you need to actually get and include a font in your android app. For this example I will be using Fontin. The main reason I’m using it is because it was easy to find and is free. Download the TTF versions and and include them in your project. Add a new subdirectory to the Assets folder in your android project named “font”. Drop the files into that folder and include them in your project. Make sure that the build action is set to AndroidAsset.

If you get the following error, make sure that the font names are spelled exactly the same as the folder and file names, including capitalization.

java.lang.RuntimeException: native typeface cannot be made

In the example from my screenshots, my font name should be: font/Fontin-Italic.ttf.

And again, capitalization matters.

Binding to Typeface

The first step is to use MvvmCross. Next all you really need to do is bind directly to the Typeface property on the TextView. They Typeface property is an instance of of Typeface (nothing surprising there) which meanst that you’ll need a converter.

<TextView
      android:layout_width="fill_parent"
      android:layout_height="wrap_content"
      local:MvxBind="Text Hello; Typeface StringToFont(FontName)" />

The converter is pretty straight forward:

public class StringToFontConverter : MvxValueConverter<string, Typeface>
{
    private static Dictionary<string, Typeface> _cache = new Dictionary<string, Typeface>();
 
    protected override Typeface Convert(string fontName, Type targetType, object parameter, System.Globalization.CultureInfo culture)
    {
        try
        {
            if (!fontName.StartsWith(@"font/")) fontName = @"font/" + fontName;
            if (!fontName.EndsWith(".ttf")) fontName += ".ttf";
 
            if (!_cache.ContainsKey(fontName))
            {
                _cache[fontName] = Typeface.CreateFromAsset(Application.Context.Assets, fontName);
            }
 
            return _cache[fontName];
        }
        catch (Exception e)
        {
            Android.Util.Log.Error("AndroidFont", e.ToString());
 
            return Typeface.Default;
        }
    }
}

First thing the converter does is to clean the input, ensuring that the font name starts with the directory and ends with the ttf extension. This makes the binding a bit easier in that we don’t have to remember to get the full font path correct.

It then check its static cache to see if it already has an instance of the the font, if not it creates one by calling Typeface.CreateFromAsset. If creation fails it does some logging and return the default typeface. This is important because in my testing VisualStudio hang pretty hard under some circumstances where errors were ignored.

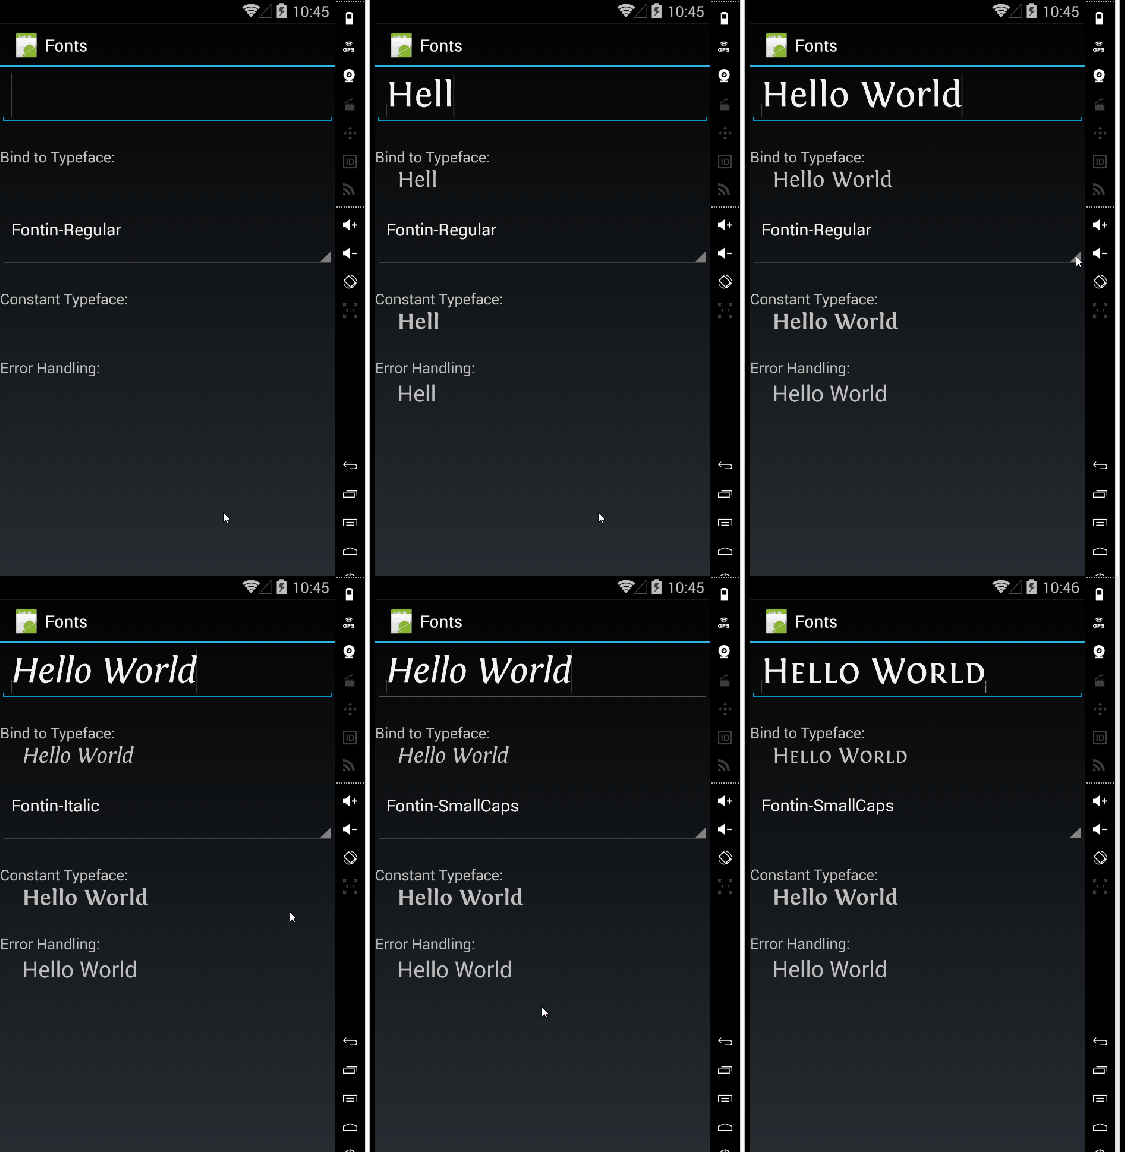
Fire this up, and you’ll see that the font is in fact set.

One problem with this example is that we are forcing the ViewModel to know the correct name for the font. In some cases that’s ok, in others, we won’t want to handle font in the VM layer. Luckily we can use Tibet binding and just bind to a static string in the xml. Just remember to surround it with single quotes.

<TextView
    android:layout_width="fill_parent"
    android:layout_height="wrap_content"
    local:MvxBind="Text Hello; 
                   Typeface StringToFont('Fontin-Bold')" />

Sample

Here’s a sample layout putting everything together.

<?xml version="1.0" encoding="utf-8"?>
<LinearLayout xmlns:android="http://schemas.android.com/apk/res/android"
    xmlns:local="http://schemas.android.com/apk/res-auto"
    android:orientation="vertical"
    android:layout_width="fill_parent"
    android:layout_height="fill_parent">
    <EditText
        android:layout_width="fill_parent"
        android:layout_height="wrap_content"
        android:layout_marginBottom="24dp"
        android:textSize="40dp"
        local:MvxBind="Text Hello; Typeface StringToFont('Fontin-Bold')" />
 
<!-- Binding to the View Model -->
    <TextView
        android:layout_width="fill_parent"
        android:layout_height="wrap_content"
        android:textSize="16dp"
        android:text="Bind to Typeface:  " />
    <TextView
        android:layout_width="fill_parent"
        android:layout_height="wrap_content"
        android:layout_marginLeft="24dp"
        android:textSize="24dp"
        local:MvxBind="Text Hello; Typeface StringToFont(SelectedFont)" />
    <MvxSpinner
        android:layout_width="fill_parent"
        android:layout_height="wrap_content"
        android:layout_marginBottom="24dp"
        android:textSize="24dp"
        local:MvxBind="SelectedItem SelectedFont; ItemsSource FontNames;" />
 
<!-- Binding to a constant -->
    <TextView
        android:layout_width="fill_parent"
        android:layout_height="wrap_content"
        android:textSize="16dp"
        android:text="Constant Typeface:  " />
    <TextView
        android:layout_width="fill_parent"
        android:layout_height="wrap_content"
        android:layout_marginLeft="24dp"
        android:layout_marginBottom="24dp"
        android:textSize="24dp"
        local:MvxBind="Text Hello; Typeface StringToFont('Fontin-Bold')" />
 
<!-- Error -->
    <TextView
        android:layout_width="fill_parent"
        android:layout_height="wrap_content"
        android:textSize="16dp"
        android:text="Error Handling:  " />
    <TextView
        android:layout_width="fill_parent"
        android:layout_height="wrap_content"
        android:layout_marginLeft="24dp"
        android:layout_marginBottom="24dp"
        android:textSize="24dp"
        local:MvxBind="Text Hello; Typeface StringToFont('Not a font name')" />
</LinearLayout>

The edit box and first text box are bound to the value in the spinner. The second text box is staticly bound to the bold font. The last text box is bound to a value that is not a valid font and defaults to the default Android font.

Here’s a link to the working project on git.

Happy Coding

this post was originally on the MasterDevs Blog

To recap, I’m writing a shopping cart app for Windows Phone, Android, and iOS. The purpose of the app is primarily to let me use Forms. Each post will build on top of the previous one.

Last time I fiddled with async loading and added an application level menu. This week I’m going to add native views on Windows Phone and Android using PageRenders.

Recap and Code

This is the tenth post in the series, you can find the rest here:

  • Day 0: Getting Started (blog / code)
  • Day 1: Binding and Navigation (blog / code)
  • Day 2: Frames, Event Handlers, and Binding Bugs (blog / code)
  • Day 3: Images in Lists (blog / code)
  • Day 4: Search and Barcode Scanner (blog / code)
  • Day 5: Dependency Injection (blog / code)
  • Day 6: Styling (blog / code)
  • Day 7: Attached Behaviors (blog / code)
  • Day 8: Writing to Disk (blog / code)
  • Day 9: App and Action Bars (blog / code)
  • Day 10: Native Views (blog / code)

For a full index of posts, including future posts, go to the GitHub project page.

About Page

I want to add a quick about page to the app. I’ll be honest here, I couldn’t think of a great example where the views would be drastically different depending on the platform. They will probably look almost exactly the same. Specifically, they will contain two buttons that will take the user to this blog, (specifically this post), or to the GitHub project page. The WinPhone version will contain two extra labels. Not overly fancy, but educational enough.

First things first, I’ll add a simple view model:

public class AboutViewModel : BaseViewModel
{
    public AboutViewModel()
    {
        OpenUrlCommand = new Command<string>(s => Device.OpenUri(new Uri(s)));
    }
 
    public string BlogUrl { get { return @"http://blog.masterdevs.com/xf-day-10/"; } }
 
    public string CodeUrl { get { return @"https://github.com/jquintus/spikes/tree/master/XamarinSpikes/ShoppingCart"; } }
 
    public ICommand OpenUrlCommand { get; private set; }
}

The only thing remotely interesting here is the Device.OpenUri(…) call. It does pretty much what you expect it to, namely opens the URI in the native browser. This view model is so simple that I don’t even really need to inherit from BaseViewModel. I do anyway just to future proof it and for consistency.

Next thing I need to do is add the AboutPage stub in in the core project (ShoppingCart.csproj). For reasons I’ll go into a bit later, this can’t be defined in Xaml.

namespace ShoppingCart.Views
{
    public class AboutPage : ContentPage
    {
        public AboutPage()
        {
            Title = "About";
            Content = new Label { Text = "This page is not available for your platform", }; 
        }
    }
}

Nice and simple. Just set the title and get out of there.

Now all I need to do is wire up a button somewhere to navigate me to this page. I already have an action bar and app bar on the main CategoriesListPage, so I’ll just add another button there.

<ContentPage.ToolbarItems>
  <ToolbarItem Name="Log Out" Command="{Binding LogOut}"  Order="Primary" Priority="0">
    <ToolbarItem.Icon>
      <OnPlatform x:TypeArguments="FileImageSource"
                  WinPhone="Assets/Logout.png"
                  Android="ic_action_logout.png" />
    </ToolbarItem.Icon>
  </ToolbarItem>
 
  <ToolbarItem Name="About"
               Command="{Binding AboutCommand}" 
               Order="Secondary"
               Priority="0"/>
</ContentPage.ToolbarItems>

I don’t bother with an icon, so I put it in the “Secondary” order. On WinPhone and Droid this means it will only show up win you hit the three dots to expand the menu. It’s bound to the “AboutCommand” which just uses the existing navigation system to take you to the AboutPage.

WinPhone

The first step to getting a native page shown is to define a native page. So here’s the Xaml for my WinPhoneAboutPage.

<phone:PhoneApplicationPage
    x:Class="ShoppingCart.WinPhone.Views.WinPhoneAboutPage"
    xmlns="http://schemas.microsoft.com/winfx/2006/xaml/presentation"
    xmlns:x="http://schemas.microsoft.com/winfx/2006/xaml"
    xmlns:phone="clr-namespace:Microsoft.Phone.Controls;assembly=Microsoft.Phone"
    xmlns:shell="clr-namespace:Microsoft.Phone.Shell;assembly=Microsoft.Phone"
    xmlns:d="http://schemas.microsoft.com/expression/blend/2008"
    xmlns:mc="http://schemas.openxmlformats.org/markup-compatibility/2006"
    FontFamily="{StaticResource PhoneFontFamilyNormal}"
    FontSize="{StaticResource PhoneFontSizeNormal}"
    Foreground="{StaticResource PhoneForegroundBrush}"
    SupportedOrientations="Portrait" Orientation="Portrait"
    mc:Ignorable="d"
    shell:SystemTray.IsVisible="True">
 
    <Grid x:Name="LayoutRoot" Background="White">
        <Grid.RowDefinitions>
            <RowDefinition Height="Auto" />
            <RowDefinition Height="*" />
        </Grid.RowDefinitions>
 
        <StackPanel Grid.Row="0" Margin="12,17,0,28">
            <TextBlock Text="Shopping Cart"
                       Style="{StaticResource PhoneTextNormalStyle}"
                       Foreground="{StaticResource PhoneAccentBrush}" />
            <TextBlock Text="about" Margin="9,-7,0,0"
                       Style="{StaticResource PhoneTextTitle1Style}"
                       Foreground="{StaticResource PhoneAccentBrush}" />
        </StackPanel>
 
        <Grid x:Name="ContentPanel" Grid.Row="1" Margin="12,0,12,0">
            <Grid.RowDefinitions>
                <RowDefinition Height="*" />
                <RowDefinition Height="auto" />
                <RowDefinition Height="*" />
                <RowDefinition Height="auto" />
                <RowDefinition Height="*" />
            </Grid.RowDefinitions>
 
            <Button Grid.Row="1" Content="Browse Source Code"
                    Command="{Binding OpenUrlCommand}"
                    CommandParameter="{Binding CodeUrl}" />
 
            <Button Grid.Row="3" Content="Read Blog"
                    Command="{Binding OpenUrlCommand}"
                    CommandParameter="{Binding BlogUrl}" />
        </Grid>
    </Grid>
</phone:PhoneApplicationPage>

A very standard view. The next thing I need to do is to set the DataContext of the page so my bindings actually work. I’m inclined to follow the MvvmLight model with the ServiceLocator, but in all honesty that seems like a lot of ceremony for what I know will be one instance of a native view in this app. So, I cheat a little a bit and just manually set the context in the code behind:

public partial class WinPhoneAboutPage : PhoneApplicationPage
{
    public WinPhoneAboutPage()
    {
        this.DataContext = ShoppingCart.App.AboutViewModel;
        InitializeComponent();
    }
}

Now to wire it up I’ll add a PageRenderer:

public class WinPhoneAboutPageRenderer :  Xamarin.Forms.Platform.WinPhone.PageRenderer
{
    protected override void OnElementChanged(ElementChangedEventArgs<Page> e)
    {
        base.OnElementChanged(e);
        this.Children.Add(new AboutPage());
    }
}

And now that we have the PageRenderer defined, we need to tell the system to actually use it:

[assembly: ExportRenderer(typeof(ShoppingCart.Views.AboutPage), 
                          typeof(ShoppingCart.WinPhone.Views.WinPhoneAboutPageRenderer))]

This line can go anywhere in the assembly (just not within a namespace). A lot of the examples place it in the same file as the renderer. This has the benefit of keeping it close to where we’re using it. I’ve elected to add this line at the beginning of the WinPhoneSetup file. If we wind up with several definitions for renderers, it would be nice to have them all in one place. I could be wrong about this.

Firing up the emulator and this looks… more than a little wrong.
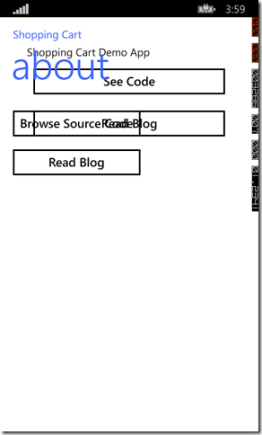
So, on my fist pass of the ShoppingCart.AboutPage, I had added a label and two buttons. When the WinPhoneAboutPageRenderer created the WinPhoneAboutPage, it just overlaid it on top of the existing controls. Ok, so what if we add a call to Children.Clear()? This still doesn’t look right, and to show exactly what’s wrong, I’ve added a splash of color to the page.
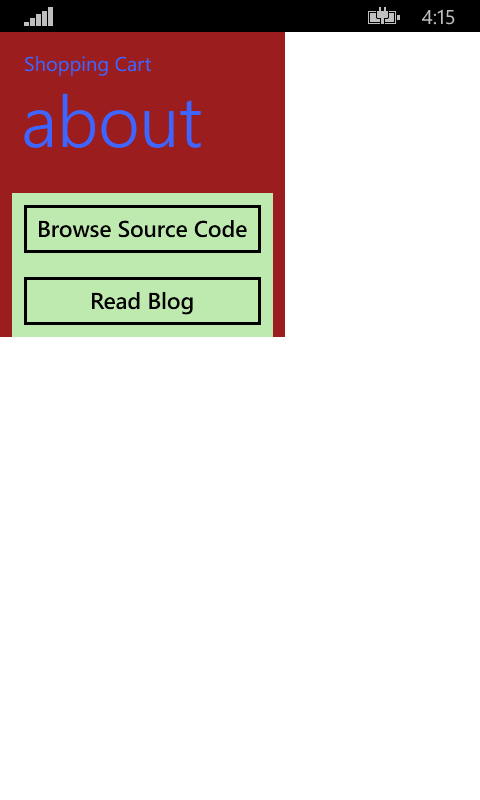
I set the background color of the entire page to red, and of the grid with my buttons to a light green. As you can see, it’s not exactly taking up the entire page.

Children.Add doesn’t seem to be working for me at all, so I’ll try calling SetNativeControl. The problem here is that since I’ve inherited from PageRenderer it expects a Xamarin.Forms.Page and I have a Microsoft.Phone.Controls.PhoneApplicationPage. So I need to change what I’m inheriting from.

public class WinPhoneAboutPageRenderer 
  : VisualElementRenderer<Xamarin.Forms.Page, 
                          Microsoft.Phone.Controls.PhoneApplicationPage>
{
    protected override void OnElementChanged(ElementChangedEventArgs<Page> e)
    {
        base.OnElementChanged(e);
        SetNativeControl(new WinPhoneAboutPage());
    }
}

Now that I’m inheriting from the VisualElementRenderer (the base class for the PageRenderer), I can specify that the object I’ll specify to replace the Xamarin.Forms.Page will be a WinPhone page. Now it’s a simple matter of passing SetNativeControl a new instance of my WinPhoneAboutPage. This winds up looking like what I want.
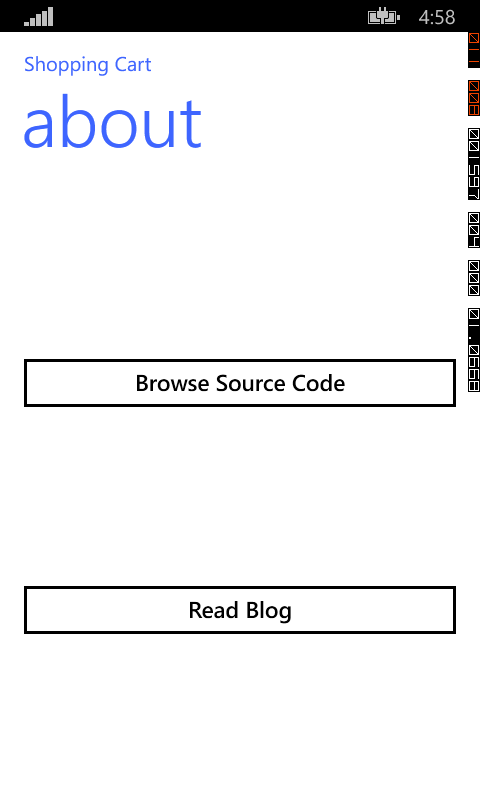
Droid About Page

Moving on to Droid, I create an xml file defining my layout.

<?xml version="1.0" encoding="utf-8"?>
<LinearLayout xmlns:android="http://schemas.android.com/apk/res/android"
    android:orientation="vertical"
    android:layout_width="fill_parent"
    android:layout_height="fill_parent">
    <View
        android:layout_height="0dp"
        android:layout_width="fill_parent"
        android:layout_weight="1" />
    <Button
        android:id="@+id/button_blog"
        android:layout_width="fill_parent"
        android:layout_height="wrap_content"
        android:text="Read Blog" />
    <View
        android:layout_height="0dp"
        android:layout_width="fill_parent"
        android:layout_weight="1" />
    <Button
        android:id="@+id/button_code"
        android:layout_width="fill_parent"
        android:layout_height="wrap_content"
        android:text="Browse Code" />
    <View
        android:layout_height="0dp"
        android:layout_width="fill_parent"
        android:layout_weight="1" />
</LinearLayout>

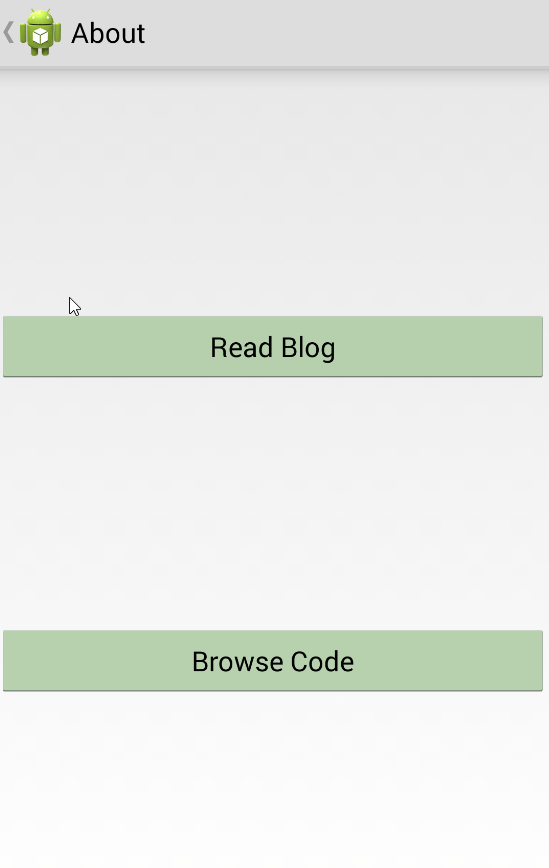
Again, simple two buttons. The views are just there as spacers.

And pretty much straight from the samples, here’s my renderer:

public class DroidAboutPageRenderer : PageRenderer
{
    private Android.Views.View _view;
 
    protected override void OnElementChanged(ElementChangedEventArgs<Xamarin.Forms.Page> e)
    {
        base.OnElementChanged(e);
 
        AboutViewModel viewModel = App.AboutViewModel;
        var activity = this.Context as Activity;
        _view = activity.LayoutInflater.Inflate(Resource.Layout.AboutLayout, this, false);
 
        var blogButton = _view.FindViewById<Button>(Resource.Id.button_blog);
        var codeButton = _view.FindViewById<Button>(Resource.Id.button_code);
 
        blogButton.Click += (sender, ev) => viewModel.OpenUrlCommand.Execute(viewModel.BlogUrl);
        codeButton.Click += (sender, ev) => viewModel.OpenUrlCommand.Execute(viewModel.CodeUrl);
        AddView(_view);
    }
 
    protected override void OnLayout(bool changed, int l, int t, int r, int b)
    {
        base.OnLayout(changed, l, t, r, b);
        var msw = MeasureSpec.MakeMeasureSpec(r - l, MeasureSpecMode.Exactly);
        var msh = MeasureSpec.MakeMeasureSpec(b - t, MeasureSpecMode.Exactly);
        _view.Measure(msw, msh);
        _view.Layout(0, 0, r - l, b - t);
    }
}

First things first, I grab the view model from my static cache. Then I just inflate my view, and start grabbing my buttons so I can add click handlers. Android doesn’t have a concept of data binding, so adding click handlers is a tad manual. Once everything is wired up, I add my view to the renderer. And now I have some errors.

I/MonoDroid( 1596): UNHANDLED EXCEPTION: System.InvalidOperationException: SetElement did not create the correct number of children
I/MonoDroid( 1596):   at Xamarin.Forms.Platform.Android.VisualElementPackager.SetElement (Xamarin.Forms.VisualElement oldElement, Xamarin.Forms.VisualElement newElement) [0x00000] in <filename unknown>:0 
I/MonoDroid( 1596):   at Xamarin.Forms.Platform.Android.VisualElementPackager.Load () [0x00000] in <filename unknown>:0 
I/MonoDroid( 1596):   at Xamarin.Forms.Platform.Android.VisualElementRenderer`1[Xamarin.Forms.Page].SetPackager (Xamarin.Forms.Platform.Android.VisualElementPackager packager) [0x00000] in <filename unknown>:0 
I/MonoDroid( 1596):   at Xamarin.Forms.Platform.Android.VisualElementRenderer`1[Xamarin.Forms.Page].SetElement (Xamarin.Forms.Page element) [0x00000] in <filename unknown>:0 
I/MonoDroid( 1596):   at Xamarin.Forms.Platform.Android.VisualElementRenderer`1[Xamarin.Forms.Page].Xamarin.Forms.Platform.Android.IVisualElementRenderer.SetElement (Xamarin.Forms.VisualElement element) [0x00000] in <filename unknown>:0 
I/MonoDroid( 1596):   at Xamarin.Forms.Platform.Android.RendererFactory.GetRenderer (Xamarin.Forms.VisualElement view) [0x00000] in <filename unknown>:0 
I/MonoDroid( 1596):   at Xamarin.Forms.Platform.Android.NavigationRenderer.SwitchContentAsync (Xamarin.Forms.Page view, Boolean animated, Boolean removed) [0x00000] in <filename unknown>:0 
I/MonoDroid( 1596):   at Xamarin.Forms.Platform.Android.NavigationRenderer.OnPushAsync (Xamarin.Forms.Page view, Boolean animated) [0x00000] in <filename unknown>:0 
I/MonoDroid( 1596):   at Xamarin.Forms.Platform.Android.NavigationRenderer.PushViewAsync (Xamarin.Forms.Page page, Boolean animated) [0x00000] in <filename unknown>:0 
I/MonoDroid( 1596):   at Xamarin.Forms.Platform.Android.NavigationRenderer.OnPushed (System.Object sender, Xamarin.Forms.NavigationRequestedEventArgs e) [0x00000] in <filename unknown>:0 
I/MonoDroid( 1596):   at Xamarin.Forms.NavigationPage+<PushAsync>d__c.MoveNext () [0x00000] in <filename unknown>:0 
I/MonoDroid( 1596): --- End of stack trace from previous location where exception was thrown ---
I/MonoDroid( 1596):   at System.Runtime.ExceptionServices.ExceptionDispatchInfo.Throw () [0x00000] in <filename unknown>:0 
I/MonoDroid( 1596):   at System.Runtime.CompilerServices.TaskAwaiter.GetResult () [0x00000] in <filename unknown>:0 
I/MonoDroid( 1596):   at ShoppingCart.Services.AppNavigation+<ShowAbout>d__4.MoveNext () [0x0001e] in c:\code\Repos\spikes\XamarinSpikes\ShoppingCart\ShoppingCart\ShoppingCart\Services\AppNavigation.cs:35 
I/MonoDroid( 1596): --- End of stack trace from previous location where exception was thrown ---
I/MonoDroid( 1596):   at System.Runtime.ExceptionServices.ExceptionDispatchInfo.Throw () [0x00000] in <filename unknown>:0 
I/MonoDroid( 1596):   at System.Runtime.CompilerServices.TaskAwaiter.GetResult () [0x00000] in <filename unknown>:0 
I/MonoDroid( 1596):   at ShoppingCart.ViewModels.CategoriesListViewModel+ctor>b__2>d__a.MoveNext () [0x0001b] in c:\code\Repos\spikes\XamarinSpikes\ShoppingCart\ShoppingCart\ShoppingCart\ViewModels\CategoriesListViewModel.cs:39 

The stack trace doesn’t say it, but this error is raised when you call AddView if the ShoppingCart.AboutPage has already had the Content property set. So, I go back to the AboutPage, and pull out the Content property:

namespace ShoppingCart.Views
{
    public class AboutPage : ContentPage
    {
        public AboutPage()
        {
            Title = "About";
        }
    }
}

Back to the DroidAboutPageRenderer, the OnLayout override is there to make sure that the view is sized to fit the whole screen. From the top left (0, 0) to the very bottom right (r-l, b-t).

Don’t forget to register it. Again, I decided to add this to the top of DroidSetup.cs.

[assembly: ExportRenderer(typeof(ShoppingCart.Views.AboutPage), 
                          typeof(ShoppingCart.Droid.Renderers.DroidAboutPageRenderer))]

Running this up, we get a wonderful (if not pretty) native layout:
iOS About Page (A Default)

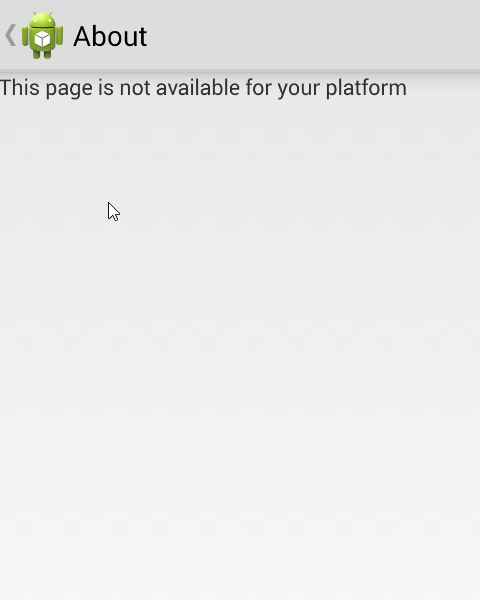
Don’t get too excited. I still don’t have access to an iDevice. But I wanted to at least try and make sure that the app wouldn’t crash on iOS. I’ve updated the core definition of the AboutPage to at least show a label explaining that this page wasn’t available.

public class AboutPage : ContentPage
{
    public AboutPage()
    {
        Title = "About";
 
        if (Device.OS != TargetPlatform.Android)
        {
            Content = new Label
            {
                Text = "This page is not available for your platform",
            };
        }
    }
}

Since we saw that Android get’s really upset if you set the content in the core version of the page and then try to use a PageRenderer in the platform (at least with my implementation of the renderer), I make sure that we aren’t running on an Android device before setting the content. The content could have been set to something much more complicated than just a simple label. It could have even used data bindings like any other page.

Since I don’t have an iPhone, here’s what it looks like on a Droid.
And now we have native views on 2 out of 3 platforms.

Happy Coding

this post was originally on the MasterDevs Blog