
Xamarin.Froms: Search and Barcode Scanner
To recap, I’m writing a shopping cart app for Windows Phone, Android, and iOS. The purpose of the app is primarily to let me use Forms. Each post will build on top of the previous one.
Last time I worked I added asynchronously loaded images to a list view. Today I plan on adding a product search that uses a barcode scanner using the ZXing component.
Recap and Code
This is the fifth post in the series, you can find the rest here:
- Day 0: Getting Started (blog / code)
- Day 1: Binding and Navigation (blog / code)
- Day 2: Frames, Event Handlers, and Binding Bugs (blog / code)
- Day 3: Images in Lists (blog / code)
- Day 4: Search and Barcode Scanner (blog / code)
- Day 5: Dependency Injection (blog / code)
- Day 6: Styling (blog / code)
- Day 7: Attached Behaviors (blog / code)
- Day 8: Writing to Disk (blog / code)
- Day 9: App and Action Bars (blog / code)
- Day 10: Native Views (blog / code)
For a full index of posts, including future posts, go to the GitHub project page.
Search
Before I implement search with a barcode, it’ll be easier if I add a search box. For now, I’ll just add it on the categories page. This should be simple, I’ll throw up a text box and a button.
<StackLayout VerticalOptions="FillAndExpand" Orientation="Horizontal">
  <Entry Text="{Binding SearchTerm}"
         Placeholder="Search"
         HorizontalOptions="FillAndExpand" />
  <Button Text ="Search"
    Command="{Binding SearchCommand}" />
</StackLayout>
Next I wire them into the view model.
private readonly RelayCommand _searchCommand;

public CategoriesListViewModel(IProductService service, INavigationService navi)
{
    _searchCommand = new RelayCommand(async () =>
    {
        var items = (await _service.Search(SearchTerm))
                    .OrderByDescending(i => i.Rating)
                    .ToList();

        if (items != null && items.Any())
        {
            Page page = items.Count == 1
                 ? page = App.GetProductPage(items.First())
                 : page = App.GetProductsListPage(items, SearchTerm);

            await _navi.PushAsync(page);
            SearchTerm = string.Empty;
        }
        else
        {
            await _navi.DisplayAlert("Error", "No results for search " + SearchTerm);
        }
    },
    () => !string.IsNullOrWhiteSpace(SearchTerm));
}

public ICommand SearchCommand { get { return _searchCommand; } }

public string SearchTerm
{
    get { return GetValue<string>(); }
    set
    {
        SetValue(value);
        _searchCommand.RaiseCanExecuteChanged();
    }
}
If our search has exactly one result, then we go directly to that product page; if there are multiple results, we show them in a list.
The ProductService already has a stub for search, but was only half implemented.
public async Task<List<Product>> Search(string searchString)
{
    var items = await _itemsAsync;

    if (string.IsNullOrWhiteSpace(searchString)) return items;

    searchString = searchString.ToLower();
    var filterd = items.Where(i => i.Name.ToLower().Contains(searchString))
                       .ToList();

    return filterd;
}
Adding a Component
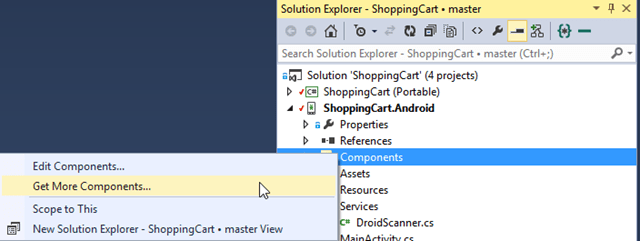
The first step in using a component is to add it to your project. Right click on the “Components” folder in your Droid or iOS project and select “Ge More Components…”
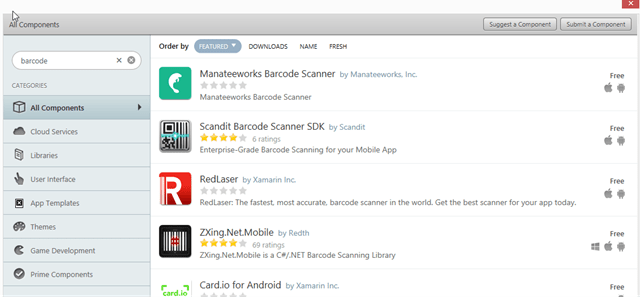
I searched for a barcode scanner and got a list of packages. ZXing sounds familiar and supports all platforms so I go with that.
Window’s phone is a little simpler in that I can just download the package from NuGet:
Install-Package ZXing.Net.Mobile
Using a Component
Since each platform references its own implementation of the barcode scanner software, I now need to create a device agnostic interface in the common project.
public interface IScanner
{
    Task<ScanResult> Scan();
}

public class ScanResult
{
    public string Text { get; set; }
}
I then implement these interfaces for each of the platforms.
Android first:
public class DroidScanner : IScanner
{
    public async Task<ScanResult> Scan()
    {
        var scanner = new MobileBarcodeScanner(Forms.Context)
        {
            UseCustomOverlay = false,
            BottomText = "Scanning will happen automatically",
            TopText = "Hold your camera about \n6 inches away from the barcode",
        };

        var result = await scanner.Scan();

        return new ScanResult
        {
            Text = result.Text,
        };
    }
}
The MobileBarcodeScanner takes the current instance of the Android context. Because this is a common requirement in Android API’s Xamarin exposes the current context in the static property Forms.Context.
WindowsPhone is essentially the same, just a different constructor:
public class WinPhoneScanner : IScanner
{
    public async Task<ScanResult> Scan()
    {
        var scanner = new MobileBarcodeScanner(MainPage.DispatcherSingleton)
        {
            UseCustomOverlay = false,
            BottomText = "Scanning will happen automatically",
            TopText = "Hold your camera about \n6 inches away from the barcode",
        };

        var result = await scanner.Scan();

        return new ScanResult
        {
            Text = result.Text,
        };
    }
}
Next I register the device specific implementations with the XF DependencyService. In my Droid project I create a file called ServiceRegistration and add the following lines
using ShoppingCart.Droid.Services;

[assembly: Xamarin.Forms.Dependency(typeof(DroidScanner))]
A similar file is created for WP:
using ShoppingCart.WinPhone.Services;

[assembly: Xamarin.Forms.Dependency(typeof(WinPhoneScanner))]
Now to create an instance of IScanner I resolve it from the DependencyService:
IScanner scanner = DependencyService.Get<IScanner>();
Now all I have to do is wire up a new button to to launch the scanner and use the results.
ScanCommand = new RelayCommand(async () =>
{
    var result = await _scanner.Scan();

    SearchTerm = result.Text;
    Search();
});
The scan command just calls into the search implementation I wrote above.
Adding Permissions
And finally, I just need to add in the permission to access the camera,
otherwise the barcode scanner component won’t be able to start up at all. On
Windows phone open up the WMAppManifest, switch to the Capabilities tab, and
make sure that ID_CAP_ISV_CAMERA is checked.
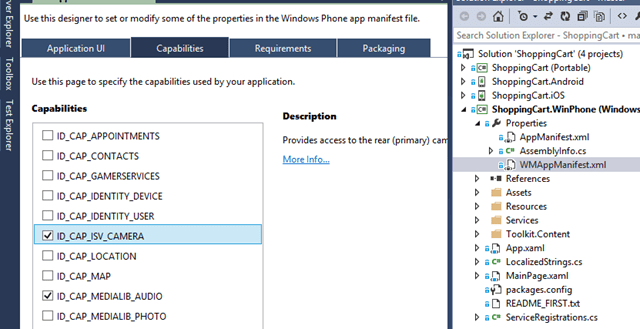
Or just edit the file by hand and add the permission by hand.
<Capability Name="ID_CAP_ISV_CAMERA" />
Android is similar. Right click the project, select Properties, go to the
Android Manifest tab, and select CAMERA in the Required permissions section.
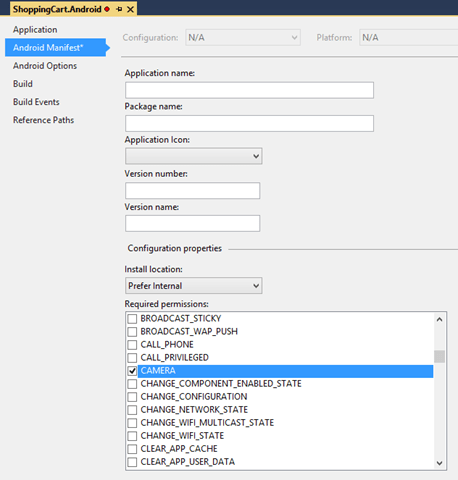
Again, you can do this manually by editing the AndroidManifest.xml file directly and adding the CAMERA permission.
<manifest xmlns:android="http://schemas.android.com/apk/res/android" android:installLocation="auto">
  <uses-sdk />
  <application></application>
  <uses-permission android:name="android.permission.CAMERA" />
</manifest>
Happy coding
this post was originally on the MasterDevs Blog