The out of the box console environment in Windows can leave a lot to be
desired. It’s hard to resize, copy/paste doesn’t work out of the box, etc.
ConEmu and Cmder
wrap the existing cmd console (really it works with any console app) and
fixes a lot of these issues. Some features (mostly stolen from the website)
- Smooth window resizing
- Tabs and splits (panes)
- Easy run old DOS applications (games) in Windows 7 or 64bit OS (DosBox required)
- Quake-style, normal, maximized and full screen window graphic modes
- Better fonts
- Using normal/bold/italic fonts for different parts of console simultaneously
- Cursor: standard console (horizontal) or GUI (vertical)
- Easily select various environments (PowerShell, cmd, admin consoles, etc)
- Hot keys
- Better mouse integration in the console
ConEmu and Cmder work in conjunction. ConEmu is the base application and Cmder
adds additional configuration and settings. I’ve used them together for so
long that I don’t really know which settings are from which program.
The rest of this post will assume you’re already using ConEmu and focus on how
to set it up in a way that allows you to customize your console environment and
keep it in sync across multiple computers. An added bonus of these requirements
is that it makes it trivial to restore your environment when reinstalling
Windows or getting a new computer.
Install Cmder and ConEmu
First up, installation. This is easy, just use chocolatey
choco install -y cmder.portable
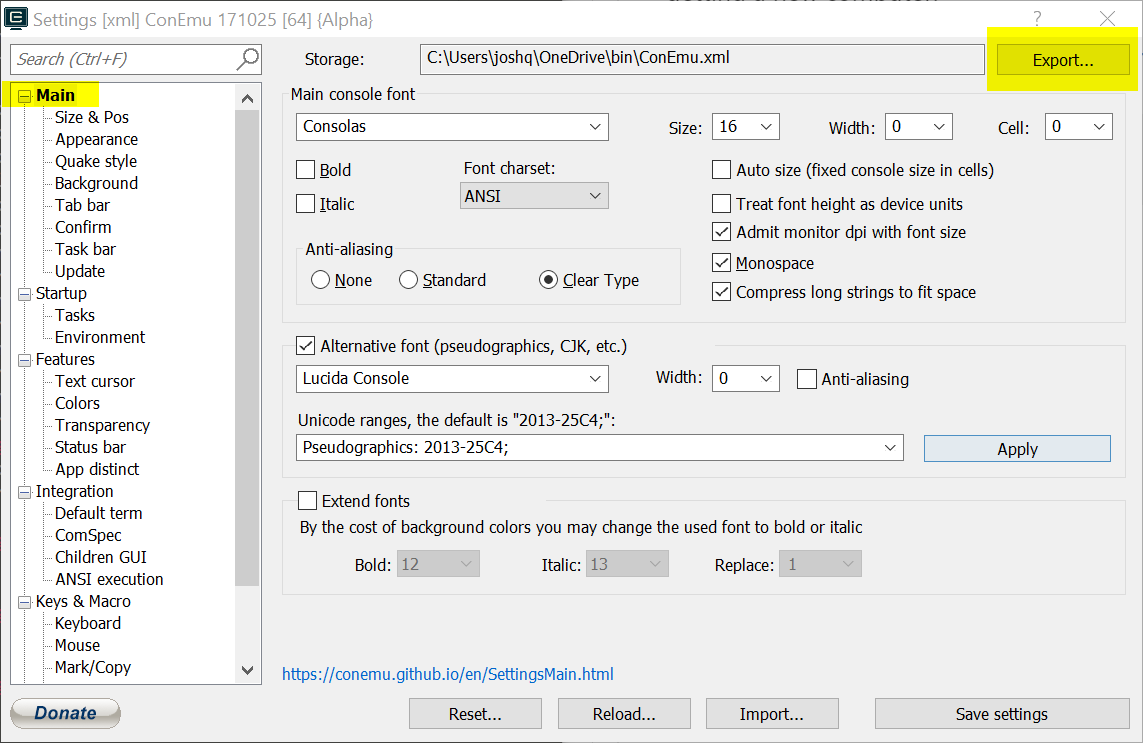
Export Settings
Well that was easy. Next we’ll start up Cmder and export the existing settings
configuration. If you haven’t used the app yet, the defaults are still worth
exporting since you need a starting point.
- Open up Cmder from the Windows Start Menu (this will start ConEmu)
- Open ConEmu’s settings window by using the hotkey
Win-Alt-P or by clicking
the hamburger menu on the bottom right corner.
- Click the
Export button that shows up in the bottom right.
- Save the file to a folder you sync across your computers (OneDrive, Dropbox,
etc). I use
c:\users\joshq\OneDrive\bin\ConEmu.xml
Use Exported Settings
Now that we have our configuration in a non standard location, we want to tell
ConEmu to use it.
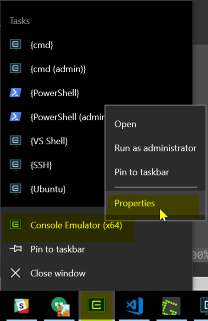
- Start up
ConEmu from the Windows Start Menu
- Right click on it in the taskbar and select
Pin to taskbar
- Close ConEmu to verify that the pin was created
- Next update the shortcut
- Right click on the pin
- Right click on
Console Emulator
-
Click Properties
- Change the target to include the
-LoadCfgFile <Path To Exported Config>
(using the config file we exported above)
Files\ConEmu\ConEmu64.exe" -LoadCfgFile C:\Users\joshq\OneDrive\bin\ConEmu.xml
- Click
OK
- Repeat this on every computer you want to use ConEmu
Now no matter what type of configuration change you make to ConEmu, your
settings will follow you across all computers and to any new ones.
Configuring ConEmu
Speaking of configurations, what’s worth tweaking from the default install?
Tweak tab settings under Main/Tab Bar. If you’d prefer that ctrl-tabbing
cycles between all tabs instead of just the most recent two, deselect Recent
mode on the top right hand corner of the page. You can also change the what
the tabs say by default by changing the Console: setting. I use ` %m->m %n
%f. It indicates the current tab with an arrow (->`), and shows the
currently running command and folder.
Under Startup, you can tell ConEmu remember your open tabs between sessions
by selecting Auto save/restore opened tabs.
With Freatures\Transparency, you can configure different transparencies for
your console when it is active and inactive. This can get pretty annoying if
you make it to transparent, but it is a nice feature if used sparingly.
And most importantly, under Startup\Tasks you can configure which consoles
are available when you press Ctrl-T. For me the minimum are cmd, an admin
cmd, and a PowerShell prompt, but you can configure
PuTTY, Ubuntu prompt
using WSL, Visual
Studio’s developer command prompt, or really any program that runs under a
command prompt.
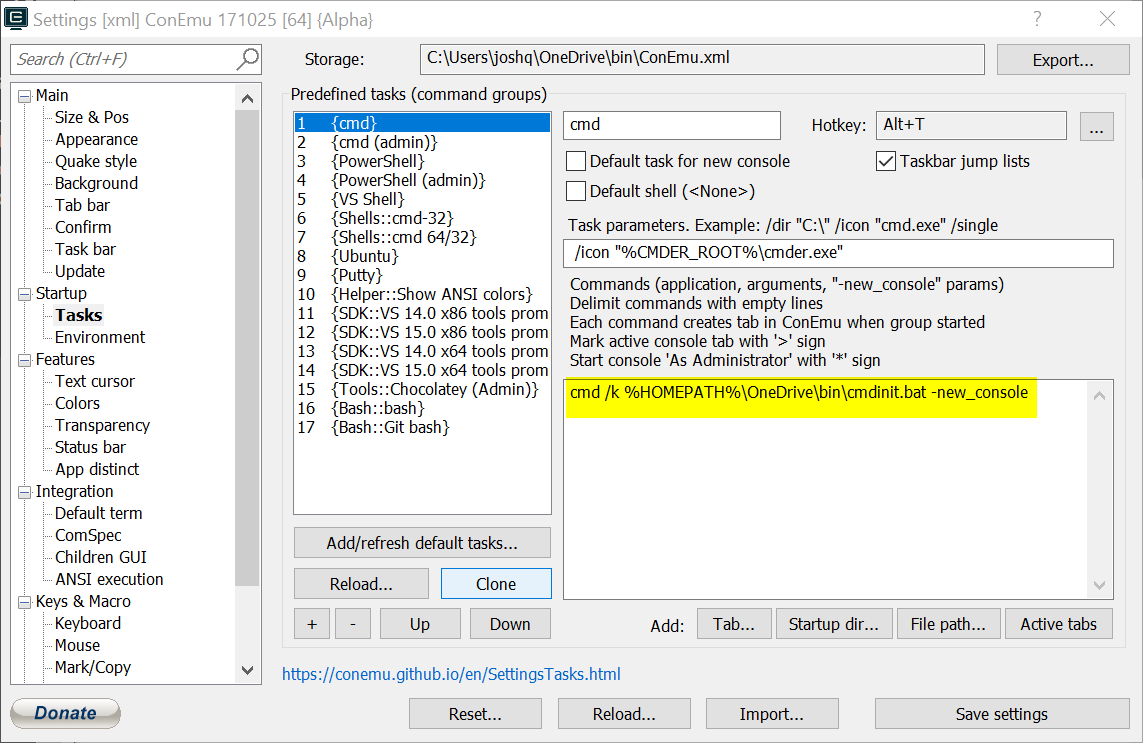
Configuring cmd
The standard cmd.exe can be started with the /k argument to specify a .bat
script to run at startup. This script can let you further customize your
console environment. You can use it to set environment variables or aliases.
It’s similar to a .bashrc in the Linux world.
To take advantage of this, edit the cmd task and set the command to run to be something like:
cmd /k %HOMEPATH%\OneDrive\bin\cmdinit.bat -new_console
We’re saving the script in the same OneDrive directory as our ConEmu
configuration file. This way both will be sunk and the console environment
will follow us from computer to computer.
This sample script does a few things:
- Adds a couple of additional folders to either the beginning or end of the
current
PATH
- Uses DOSKEY to configure some quick
shortcuts to go from the command line to the File Explorer
- Uses DOSKEY to configure some
aliases for frequent git commands. For instance, all we have to do now is
type
s to show the git status of the current directory, or co master to
switch to the master branch.
- Uses DOSKEY to add a quick way to
edit the configuration script (
aliases) and another to reload the script
if any changes have been made (refresh)
- Print out the current directory
@ECHO OFF
REM Console Startup Configuration
REM ******************************************

REM Setup PATH
REM ******************************************
SET PATH=%HomeDrive%%HomePath%\OneDrive\bin;%PATH%
SET PATH=C:\Program Files\Git\cmd\;%PATH%
SET PATH=%PATH%;C:\tools\sysinternals

REM Open the current directory in File Explorer
REM ******************************************
DOSKEY   ex=explorer $*
DOSKEY  ex.=explorer .

REM Git
REM ******************************************
DOSKEY push=git push
DOSKEY pull=git pull
DOSKEY   co=git checkout $*
DOSKEY    s=git status

REM Make it easy to edit this file
REM ******************************************
DOSKEY aliases=gvim %HomePath%\OneDrive\bin\cmdinit.bat ^& echo Don't forget to open run `refresh` to make sure these take effect
DOSKEY refresh=call %HomePath%\OneDrive\bin\cmdinit.bat

REM Print out current path when opening a new console
REM ******************************************
ECHO.
CD
There’s a lot more that can be done to with scripts like this to configure your environment. You can use the above script as a starting point and add anything you think of as you’re plugging away by running the aliases command. Any changes you make will automatically be saved and synced.