
Headered Grid View in MvvmCross. Now with bindings!
Full source code for this article can be downloaded on GitHub: HeaderedGridView.
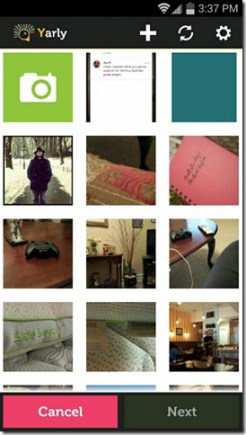
For the easy import feature of Yarly, I needed to create a view that would easily allow a user to select an existing photo to import into the app or to take new photo. A grid view of photos from the camera roll but with the first item as a button that would load the camera would serve nicely for this use case. See the screen shot below of an early version of the UI:
Yarly Screen Shots 2014-04-20_194747_242000
This reminded me of the AddHeaderView method available on ListView. With that as a guide, I decided to add similar functionality to the GridView. Since I’m using MvvmCross, I also want to make sure that I can use bindings in the header control. While I’m at it, having to explicitly call AddHeaderView in my activity code is useful, but I’d much rather to be able to do this in markup.
Requirements
To sum up the above requirements:
- Ability to add a header to a GridView in xml markup
- The header is laid out inline with the rest of the items in the GridView
- The header scrolls with the rest of the content, i.e., it is not always visible
- The header must be able to use MvvmCross bindings
Code
A full sample project can be downloaded from my GitHub repo: HeaderedGridView.
In attrs.xml, add an attribute to use for our header.
<!-- attrs.xml -->
<declare-styleable name="GridView">

   <attr name="header" format="reference" />
</declare-styleable>
In the HeaderedGridView, all we need to do now is check for the presence of this attribute, and if it exists, inflate the view. Reading the header id is straight forward processing of the IAttributeSet. I use some helper classes to iterate and dispose of the attributes in a more C# way. The details aren’t very important, but the relevant classes are included in the sample solution. The MvvmCross class MvxAndroidBindingContextHelpers can return the current binding context which can be used to inflate and bind the header at the same time.
// HeaderedGridView.cs
private void ProcessAttrs(Context c, IAttributeSet attrs)
{
    _headerId = DEFAULT_HEADER_ID;
    using (var attributes = c.ObtainDisposableStyledAttributes(attrs, Resource.Styleable.GridView))
    {
        foreach (var a in attributes)
        {
            switch (a)
            {
                case Resource.Styleable.GridView_header:
                    _headerId = attributes.GetResourceId(a, DEFAULT_HEADER_ID);
                    break;
            }
        }
    }
}

private void LoadHeader()
{
    if (_headerId == DEFAULT_HEADER_ID) return;
    IMvxAndroidBindingContext bindingContext = MvxAndroidBindingContextHelpers.Current();
    _header = bindingContext.BindingInflate(_headerId, null);
}
Now that we have a header, we can wrap our current adapter in the HeaderViewListAdapter. As the name implies, this is the exact same adapter used by the ListView. It handles knowing when and where to show the header. In my sample code, I have the grid create the adapter directly, but this can work just as well if an adapter is passed in from outside.
// HeaderedGridView.cs

private IListAdapter GetAdapter()
{
    var headerInfo = GetHeaders();
    ICursor cursor = ImageAdapter.CreateCursor(Context);
    IListAdapter adapter = new ImageAdapter(Context, cursor);

    if (headerInfo != null)
    {
        adapter = new HeaderViewListAdapter(headerInfo, null, adapter);
    }
    return adapter;
}
So I don’t have to hard code sizes and so the header matches the rest of the items in the grid, I set the height and width once the grid is being laid out. In the OnMeasure method we check if the header isn’t null, and if the ColumnWidth doesn’t match the previous column width we saw. Caching the width and testing this prevents us from setting the layout parameters when we don’t have to; OnMeasure is called multiple times.
// HeaderedGridView.cs
protected override void OnMeasure(int widthMeasureSpec, int heightMeasureSpec)
{
    base.OnMeasure(widthMeasureSpec, heightMeasureSpec);

    if (_header != null && base.ColumnWidth != _cachedColumnWidth)
    {
        _cachedColumnWidth = base.ColumnWidth;
        _header.LayoutParameters = new ViewGroup.LayoutParams(_cachedColumnWidth, _cachedColumnWidth);
    }
}
Now all we need to do is include our grid in a layout. It’s almost exactly the same as the regular GridView, except we can now optionally specify a header. This is from the FirstView layout in the sample.
<!--FirstView.axml-->
<HeaderedGridView
   android:layout_width="fill_parent"
   android:layout_height="fill_parent"
   android:layout_weight="1"
   android:numColumns="3"
   android:verticalSpacing="10dp"
   android:horizontalSpacing="10dp"
   android:stretchMode="columnWidth"
   android:gravity="center"
   android:fastScrollEnabled="true"
   android:background="#000000"
   local:header="@layout/gridheader" />
The gridheader layout is just a simple layout with a single image button button. Note that we are binding the click of the button to the ClickCommand in our view model.
<?xml version="1.0" encoding="utf-8"?>
<LinearLayout xmlns:android=http://schemas.android.com/apk/res/android
    xmlns:local=http://schemas.android.com/apk/res-auto
    android:orientation="vertical"
    android:layout_width="fill_parent"
    android:layout_height="fill_parent"
    android:padding="5dp">
    <ImageButton
        android:layout_width="fill_parent"
        android:layout_height="fill_parent"
        android:background="#90C53E"
        android:src="@drawable/camera"
        local:MvxBind="Click ClickCommand" />
</LinearLayout>
Firing up the sample solution and we should see something similar to:

Future Improvements
My implementation restricts me to only being able to add one header. While one header is currently good enough for me, if I wanted to expand it add more, I could emulate ListView a bit more. Specifically the onFinishedInflate method which adds child layouts as a list of headers. Of course, I could also add an explicit AddHeaderView method that could be called multiple times.
I’ve ignored footers entirely. Again, this is just because I don’t currently have any need for a footer. They could be added easily enough following the same pattern as headers.
Happy Coding.
this post was originally on the MasterDevs Blog