
Windows Phone 8 Emulator and Hyper-V
The Windows Phone 8 emulator depends on Hyper-V in order to run. The problem is that the consumer edition of Windows 8 doesn’t support Hyper-V. The easiest way I found to install it was to upgrade to Windows 8 Pro. Luckily with Windows 8 upgrading does not mean reinstalling. You can simply enter a new license key and you’re off to the races.
Now, none of this was obvious at least to me. Before figuring all this out I spent some time Googling and Binging. Hopefully you can use some of the information I gathered.
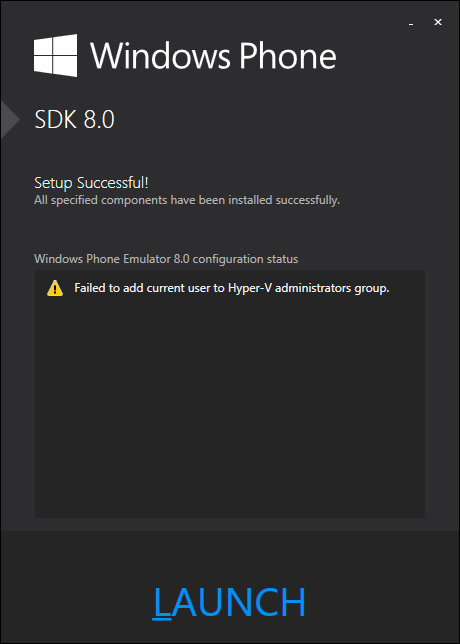
The first sign of trouble was when I installed the Windows Phone 8 SDK. If you don’t already have Hyper-V, you will see a cryptic warning that the SDK installer was not able to add you to the Hyper-V Administrators group.
Assuming this to be an important warning, I attempted to add myself the old fashioned way, through the Local Users and Groups snap-in. As it turns out though, that snap-in is not available on the standard edition of Windows 8. This should have been my first clue that something was amiss. Sadly, I didn’t pick up on it this early in the game.
Seeing myself at a bit of a dead end, I decided to move on and hope for the best. I opened up an existing Windows Phone 8 project in Visual Studio and hit debug. The next error message shed a light on why I couldn’t be added to the Hyper-V Administrators group; I didn’t have Hyper-V installed. It linked me to a somewhat useful MSDN article on the emulator’s requirements.
This article does a good job of explaining how to enable Hyper-V in your BIOS as well as Windows itself. It even tells you how to determine if your hardware can support Hyper-V. Not to repeat the article too much, but you can download Sysinternals’ Coreinfo tool and run it on the command line. Passing it the -v parameter will help minimize the noise in the output to just the fields you’re looking for. V stands for virtualization.
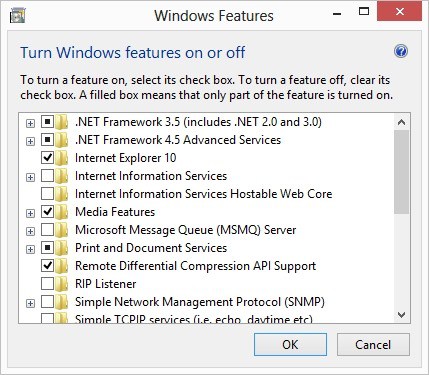
Now that I had verified that it wasn’t my hardware it was time to start looking at the software. To check what Windows features installed and/or disabled go to Programs and Features through the control panel and clicking on the “Turn Windows features on or off” link on the left hand side. Or even easier, bring up the search charm and type in “Turn Windows features on or off”. As you can see below, I didn’t have Hyper-V in my feature list.
To figure out how to get it installed, I started looking at my OS. I checked out Wikipedia to see what the different editions of Windows 8 were. Had I been smart enough to actually read the feature list at the bottom or the 3 sentence description of the editions, I would have seen that Hyper-V is only available in the 64 bit Pro and Enterprise editions. As it was, knowing that the official name of the consumer edition was simply (and confusingly) “Windows 8” was enough to verify which version of the OS came installed on my machine.
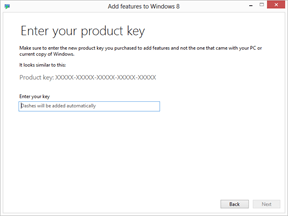
I already had an available Pro product key, so my next step was to try to upgrade as as painlessly as possible. As it turns out that was the easy part. To do this go the share charm and type in “add features to Windows 8”. You should see one option under settings. This will let you either buy a key or enter an existing one.

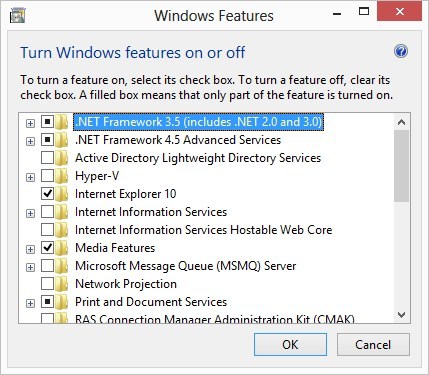
After you click next your Windows installation will upgrade itself which does take some time and a reboot. Now when we come back to the Turn Windows features on or off dialog Hyper-V is available but unchecked.
Simply check it off, click OK and wait for some more installation and reboots to happen.
Now I was finally able to go back to Visual Studio and hit debug again. I did miss one thing however. I still wasn’t in the Hyper-V Admin group. The emulator is smart enough to recognize that and offer to automatically fix it. Clicking OK on the prompt was enough to finish all the configuration I needed and finally show me my app:
this post was originally on the MasterDevs Blog